Wonder of wonders - our Raspberry Pi has arrived. Over at Quick2Wire we are beginning to get on with the business of testing hardware and software for our experimenter's kit.
I'll be blogging about the board over the next few days at DesignSpark, and I'm looking forward to meeting some potential users at our focus group this Thursday. A couple of people have dropped out, so if you might interested in attending, email me.
Monday, 16 April 2012
Friday, 6 April 2012
Poor Man's Pick and Place - Microscope deal
We're close to testing a prototype of our Poor Man's Pick and Place robot.
It's based around a 4-axis engine using three stepper motors, a servo, and a small vacuum pump, reservoir and valve to hold and move the component being placed.
A human controller will drive it, using a USB microscope to check the position of the SMD components before placing them on the board. We'll be open sourcing the plans.
We're using a 200x USB microscope form Maplin, and it's on sale over the Easter weekend. At £19.99 (half the usual price) it's a bargain. Get one while you can!
Buy it here.
Thursday, 22 March 2012
Meet the Raspberry Pi fanciers at Quick2Wire

We've also picked up some new newsletter subscribers thanks to today's interview on the DesignSpark website.
Excellent coverage: we're working hard on our add-on kits for the Raspberry Pi, and DesignSpark is the community website for RS Components, one of the two companies who are selling the Pi.
Wednesday, 21 March 2012
Value USB to TTL cables from Tronisoft
Followers will know that I have a boxful of hand-built Arduino clones, some of which will soon be finding good homes with my colleagues at quick2wire.
The only snag is that the clones don't have on-board FTDI chips, so you need a USB to TTL converter - a cable or a breakout board.
The cables typically cost around £15, so I was delighted to find a version at around £9 including VAT from Tronisoft Limited. I ordered three which arrived today; the one I've tried works fine.
The only thing to watch out for is that the 6-way cable (which resembles the ones I'm used to) is out of stock, so I had to order cables with a 7-way connector. The seventh socket is connected to a shield, and it looks as if it can be left unconnected.
Do your own evaluation before you buy, but it seems like a bargain to me.
The only snag is that the clones don't have on-board FTDI chips, so you need a USB to TTL converter - a cable or a breakout board.

The only thing to watch out for is that the 6-way cable (which resembles the ones I'm used to) is out of stock, so I had to order cables with a 7-way connector. The seventh socket is connected to a shield, and it looks as if it can be left unconnected.
Do your own evaluation before you buy, but it seems like a bargain to me.
Monday, 19 March 2012
Arduino and EasyDriver turning a Stepper Motor
One of the great things about Arduino is that whatever you're trying to do, there is a good chance that someone has done it before and posed the code.
Mark Gilbey and I are currently working on my poor man's pick and place 'bot. We'll be moving the head around using some SparkFun steppers, and I liked the look of the EasyDriver Stepper Controller.
The EasyDriver website has an examples page which includes a wiring diagram and sample Arduino sketches. I tried it out and everything just worked.
The motor is turning in micro-steps of 1/800th of a revolution, at a speed of 5000 micro-steps per second.
Sunday, 18 March 2012
Pachube workshop Video - Arduinos at work
I shot a short video at last week's Pachube workshop. We learned how to use Arduino Ethernet boards and shields to provide real-time data to Pachube's free on-line service.
Thoroughly recommended.
Friday, 16 March 2012
Pachube, Arduino and the Internet of Things
If you're interested ion the Internet of Things you probably know about Pachube. They offer a free real-time data infrastructure that makes it easy for users to share data from just about any internet-enabled device.
Through the Pachube website you can monitor the temperature in Iceland, the humidity in London or the radiation in Japan. You can even set up triggers so that you get an SMS alert whenever a value exceeds a specified threshold.
Pachube are currently organising a series of Data Making Workshops to help people get started with their service. I've just got back from one; it was great fun and really informative. About a dozen of us worked our way through Pachube's API, and then set up data feeds from our ethernet-enabled Arduinos. (If you're curious about the light level in my study at home, you're welcome to take a look.)
It was a great practical introduction, and gave us lots of ideas for future projects.
Pachube will be organising more introductory and advanced workshops in London, Barcelona and New York. Details on their website. If you're based in London, you can enrol via this meetup.
The current API is great but there are some interesting beta interfaces available to the brave and curious. There's a web-socket implementation as well as an mqtt bridge. Because they are betas, both services are subject the the usual caveats: the API might change dramatically, and the service might be withdrawn. That said, these are services that are likely to be of long-term significance, and it's great to have a chance to try them out.
And now I'm off to write a Python wrapper for their API; it should be useful for the Beaglebone, Beagleboard and Raspberry Pi.
Practical Robotics - Python, Arduino, OpenCV and Squirrels
Who says that this stuff has no practical use? Here's how to deal with those pesky squirrels.
Thursday, 15 March 2012
Arduino Ethernet board and IoT

The Arduino ethernet example sketches include a Web Server which displays the values of the Arduino's analog ports.
I rigged up a breadboard with a potentiometer and connected it to the Arduino Ethernet board.
Then I downloaded the sketch, and hey presto: here's a a web page displaying the pot setting.
With 6 years of history and 600,000 users, Arduino and its documentation have been tested and re-tested. Arduino examples just work. Relative newcomers like the Beaglebone are catching up, but the Arduino has set a high standard to aim for.
Wednesday, 14 March 2012
oomlout to the rescue!
On Friday I'm off to a data making workshop at Patchube organised by the London Internet of Things meetup.
Late yesterday I spotted that I will need an Arduino Ethernet board, or an Arduino with an Ethernet shield. I have Arduinos like some people have mice, but no Ethernet Shield, and I'm away from home for the next couple of days. How could I get one in time?
I ordered a board from .:oomlout:. and it arrived this morning. Thanks, guys, for your usual lightning-fast service.
I love the new Arduino packaging.
A lesson from the mbed
Yesterday in a short post about I2C I published a fragment of code for the mbed.
I wondered at the time why I was posting here rather than on the very helpful mbed site.
Here's why.
Take a look at the code, and think about the library it's using.
The mbed I2C library is about as simple as you could wish for, but it does everything you need. You can even specify the I2C data rate at run time.
On other platforms that small change is a big deal; Arduino requires you to recompile the Wire library, and the BeagleBone requires you to recompile the kernel.
The mbed library for SPI is just as good as its I2C library: simple, intuitive and complete.
That's what we need on the BeagleBone and Raspberry Pi.
We've been waiting for userland SPI support on the BeagleBone for a while, and we seem to be getting a mixed message from the kernel developers:
That's not what we want. We want userland configuration that's as easy as it is on the mbed, and we need clever people to do it and push their work upstream.

Here's why.
Take a look at the code, and think about the library it's using.
The mbed I2C library is about as simple as you could wish for, but it does everything you need. You can even specify the I2C data rate at run time.
On other platforms that small change is a big deal; Arduino requires you to recompile the Wire library, and the BeagleBone requires you to recompile the kernel.
The mbed library for SPI is just as good as its I2C library: simple, intuitive and complete.
That's what we need on the BeagleBone and Raspberry Pi.
We've been waiting for userland SPI support on the BeagleBone for a while, and we seem to be getting a mixed message from the kernel developers:
- It's really hard to do SPI right, and it will take a while
- It's done already; all you have to do is find half-a-dozen emails scattered round various user groups, merge the information, patch the correct kernel version, recompile the kernel, flash a card, and repeat whenever there's a kernel update :(

There is some hope. Yesterday, @waxpraxis tweeted that he'd added userland SPI to a custom kernel for the Beaglebone, and he plans to write up and release his patch. Now we just need that (and I2C support) for the Raspberry Pi!
And a Pi to run it on, of course.
Update: @waxpraxis has posted/uploaded his BeagleBone SPI-enabled image, and is working on the documentation. Thanks!
Tuesday, 13 March 2012
PCF8574, I2C and the mbed
A user on the mbed site asked for some help getting an I2C application to work with the mbed.
He's using a PCF8574 port expander which is driven from one of the mbed's I2C busses, which is on pins p9 and p10.
He wants to turn a LED on when a button is pushed. The button is connected to P4 on the port expander; the LED is attached to pin 5.
Here's the breadboarded circuit under manual test :)
And here's the code:
#include "mbed.h" #include "PCF8574.h" PCF8574 io(p9,p10,0x40); int main() { while(1) { io.write(0x30); if ((io.read() & 0x20) == 0) { io.write(0x20); } } }
Wednesday, 7 March 2012
BeagleBone driving LED Bar via I2C
I've just posted a video of the BeagleBone driving a bar LED via I2C. The Bone is programmed in Python, and I'll shortly be checking the (open source) code in at Quick2Wire's github repository.
Expect to see a Raspberry Pi performing the same trick as soon as we can get our hands on one!
I hit a couple of snags while getting this going. Fortunately the inexpensive OpenWorkbench Logic Sniffer makes it really easy to debug I2C and SPI applications.
Expect to see a Raspberry Pi performing the same trick as soon as we can get our hands on one!
I hit a couple of snags while getting this going. Fortunately the inexpensive OpenWorkbench Logic Sniffer makes it really easy to debug I2C and SPI applications.
![]() |
I2C debugging with OLS: SCL is blue, SDA is green |
Friday, 2 March 2012
Pick and Place on a budget - Part 2
More progress on our human-controlled Pick and Place machine.
I now have the threaded rod and stepper motors, and Mark Gilbey is coming here next week to discuss the mechanical design.
We plan to build a manually-controlled Pick and Place machine with 4 degrees of freedom, (X, Y, Z and rotation) which will vacuum up an SMT part, move it to the right position on the board, align it and then place it on the board. We'll use a joystick and pot to control it, while we watch what is going on through a USB microscope.
The USB microscope works with OpenCV, so we can leave the door open to an automated PnP robot. I wonder what we should use as the processor board?
Thursday, 1 March 2012
A second helping of Raspberry Pi
If you want one of the next batch you can pre-order
Raspberry PI
at Farnell.
Orders are still limited to one per person at the moment; if you order more than one, the order will be amended.
Wednesday, 29 February 2012
Mastering the I2C bus - review
I just got my copy of Mastering the I2C bus - an excellent book, the first in Elektor.com's LabWorx series.
The author, Vincent Himpe, really knows his stuff. I've been using the I2C bus since I started with PIC micros back in the last millennium, but I learned something on just about every page of the book.
The book covers the background and history of the I2C bus and explains it from hardware and software perspectives.
There's a useful chapter on FAQs, and the book also covers debugging. The author makes a good selection of commonly used devices, and explains how to use them. The last part of the book describes a series of I2C project boards, (available from an Elektor partner) and covers their purpose, their design and application.
You're encouraged to download code from a dedicated website. I had a problem getting on the site yesterday, but after a fast response from Elektor I now have access to the software and PCB layouts.
We'll be supporting I2C on the board we're making for the Raspberry Pi over at quick2wire.com, and the book is now recommended reading for all the hardware and software developers on the team.
Eben Upton talks to /.
Eben Upton recorded this video with Slashdot about the distribution of Raspberry Pi a few days ago.
Pi please
The Raspberry Pi launch has happened. Sort of.
The Pi is selling from from Farnell and RS Components. Except both sites have crashed, due to the demand.
There will be a lot of impatient people today, and for now I suspect that the main mood among RasPi supporters is frustration.
That will pass.
Somehow this tiny $35 computer has captured the minds of people in the same way as the Apollo moon landings did. (Yes, I was watching as the Eagle landed). At a time when we're all feeling the pinch of austerity, and uncertain about the future, the Pi is a ray of hope - a sigh that bad times may be here, but better times will come.
I spent last evening in the company of geekish friends at the Extreme Tuesday Club. Just about everyone had heard of Raspberry Pi, and there was a warm glow about it. Best of all, I met an old friend who knows someone who might buy my vintage Acorn microcomputer. I offered it in exchange for a donation to the Pi foundation a while back, and was met by a deafening silence, but it seems that there is a collector who may be interested. The money will go to the Foundation.
And soon, Farnell and RS will be back on the air and we will be able to order this miracle. I'm happy to wait.
Monday, 27 February 2012
Grove, the Arduino and Raspberry Pi
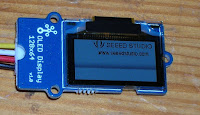
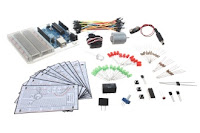
I've been crazy busy with our start-up for the last week or so, but I've still managed to find time to look at Seeed Studio's Grove Toy Kit.
The kit consists of an Arduino shield (the Twig), a set of peripherals (the Leaves), and a set of cables that you use to link them up.
The Leaves in the Toy Kit include a couple of high-powered servos, a tri-colour LED, a tiny, crisp 128*64 OLED display, a sound sensor, a buzzer, a PIR motion sensor, a 3-axis accelerometer and plenty of cables.
There are many other leaves available, and they can all connected to the motherboard using the cables provided. The documentation is sparse, but usable; we'll do our best to add to it.
At present the Grove is targeted at the Arduino, but we're looking at the possibility of connecting it to the Raspberry Pi. It's a natural fit with our planned extension board, and would offer an excellent platform for experimenters wanting to explore the Internet of Things.
The kit consists of an Arduino shield (the Twig), a set of peripherals (the Leaves), and a set of cables that you use to link them up.
OLED display |
There are many other leaves available, and they can all connected to the motherboard using the cables provided. The documentation is sparse, but usable; we'll do our best to add to it.
At present the Grove is targeted at the Arduino, but we're looking at the possibility of connecting it to the Raspberry Pi. It's a natural fit with our planned extension board, and would offer an excellent platform for experimenters wanting to explore the Internet of Things.
Friday, 24 February 2012
Virtual friends become real at OSHUG
Last night I went along to an excellent free meeting organised by OSHUG (the Open Source Hardware User Group).
The timing couldn't have been better. The topic was Manufacturing, and we had three excellent presentations about the realities of bringing Open Source Hardware products to market. Since quick2wire is going to open source our Hardware, Software and Documentation, this was spot on for me!
The talks were great, but the session in the pub was also really useful, and fun. I got to meet two people I've previously only known on-line: Sukkin Pang, the founder of SK Pang electronics, and Aaron Nielsen who runs .:oomlout:. here in the UK. Both are great guys, really ready to share information and help us out. I also got to make a whole raft of other new friends from the Open Source Hardware community.
The group meets once a month and I shall certainly be going along to future sessions. You can find out more at their website.
Thursday, 23 February 2012
Two steps closer to our Raspberry Pi add-on
![]() |
oomlout's ARDX starter kit |
We've had quite a few people signing up for email news at our rather minimalist website. Today I'll be sending out a few details of what we have in mind, along with a very short questionnaire about the contents of the planned kit.
Meanwhile I'm prototying the board that will be at the heart of the kit. It uses a few surface mount devices.
I'm a bit old to be soldering things I can hardly see, but I've just got the first level shifter chip mounted on a DIP board, and I'm hoping to breadboard a working interface over the week-end.
Of course, we don't have a Raspberry Pi to test against yet (hint, Liz!), so we will be using BeagleBones until we do. Both can be programmed in Python, both use 3.3 volt I/O, and both run Linux, so the move from Beagle to Pi should be fairly painless.
I'll be posting more as work progresses, and we'll have more information on the Quick2Wire website soon.
Meanwhile, if you're interested, drop by the site and sign up for email updates.
Tuesday, 21 February 2012
Fun on the river with oomlout's Arduino starter kit
I've just got back home after an enjoyable afternoon introducing my brother-in-law to the Arduino. He's a designer by profession. He lives on a Dutch barge near Canary wharf, so he's a competent electrician, but he's new to embedded hardware and micro controllers.
(If you want a quiet but luxurious place to stay in Docklands with a 5 star breakfast, take a look at their website).
I took along oomlout's excellent ARDX arduino starter kit, and by the afternoon he was tweaking happily tweaking example sketches. He now sees why I find the embedded world so exciting, and I hope he'll be contributing to our Raspberry Pi-based projects at quick2wire.
At the end of our session we started talking about CAD for electronics. As a designer he uses CAD a lot and wondered what CAD tools were used for electronics. Since we'd spent the afternoon working with a breadboard, I showed him Fritzing, When he saw how easy it was to lay out a breadboard circuit, then go to a schematic and a PCB layout it blew him away.
"Is that used in schools?" he asked.
Not yet, that I know of, but it soon will be if we have our way :)
Team tweeting with respect for the audience
We've got an interesting problem to solve over at quick2wire.com.
There are eight of us active in the project right now, and @quick2wire also has its own twitter account. Several of us have known each other for years; there is quite an overlap between the groups of people who follow us on twitter. There are also some big differences.
We're trying to work out who re-tweets what, in a way that gives us good coverage without our followers seeing nine copies of each tweet.
So I want to find out
- for each team member, how many unique followers they have and
- for each pair of team members, how many followers they share
I have not found a tool that does both those things. If you know of one, please let me know! If we can't find one we will write a script and open source it, as this must be a common problem.
Monday, 20 February 2012
Another morsel of Pi
We're in the last stages of stealth mode, so you'll have to wait a little longer to find out what we're up to. At least the quick2wire website is now officially open. No content yet but you can already subscribe to our mailing list and get more information as soon as we release it.
Like you, we're eagerly awaiting the sale of the first production versions of Raspberry Pi. There are 100,000 of us on the mailing list waiting to buy it and over 20,000 followers on twitter. Raspberry Pi is the result of great dedication from the small team of volunteers who've got us this far. They've earned their huge following.
Good to see today that the customised remix of Fedora should be ready for download on Wednesday. Now that the hardware is coming off the line, the vital thing will be to make sure that there is a stable, feature-rich, well-documented software environment. Pi's army of enthusiastic supporters can make a real contribution to that.
Saturday, 18 February 2012
Something extra with your Pi?
Regular visitors will know that this blog ground to a standstill in December last year, and is only now coming back to life.
For the last couple of months I have been working flat out; first on a series of TDD courses for two of my favourite clients, then on a start-up which is about to come out of stealth mode and go public in the next few days.
The timing is linked to the release of Raspberry Pi - the credit-card sized Linux-capable computer-on-a-board which will be selling for $35 any day now.
We're going to be developing and selling some add-on products to complement Raspberry Pi. I'll post more details here as soon as I can, and I think you'll find them exciting.
We plan to launch with the help of a crowd-funding site, which means that we'll need all the publicity we can get. So when the great day dawns, take a look at what we're doing, and if you like it, please
- Fund us! You'll be able to do so for a very modest amount, though bigger donors will get some very tempting perks.
- Blog about us!
- Re-tweet the stream of tweets that we'll be putting out.
We hope you'll find the products as much fun as we do.
Friday, 10 February 2012
Could this be your chance to win an Arduino due?
tronixstuff are running an exciting competition with two prizes: an EtherMega board and a mystery prize.
From the tantalising description this sounds as if it could be your chance to win the new ARM-based Arduino due which will give you Arduino libraries running on a 32-bit CPU.
John Boxall's tronixstuff blog is a great resource if you're into Arduino. The only thing to note about the competition is that tronixstuff is based in Oz, so you may have to pay import duty, VAT and other annoyances. It still has to be well worth a go.
Tuesday, 7 February 2012
Raspberry Pi - two things you've been waiting for without even knowing
The first production batch of Raspberry Pi boards will be finished on 20th February. Yay!
It's been a long wait, but an understandable one. Anyone who has been involved with getting a product to market knows the pitfalls that delay, and delay, and delay again. With the Pi, the team have done an amazing job; we're getting all the functionality that was promised at an astounding price.
The other good news is that Broadcom have released a datasheet describing the peripherals available to the ARM chip used in the Pi. This will make to easier for us to use things like the timer; it also explains memory mapping and other topics which will be of interest to anyone who wants to work close to the metal of the Pi.
In particular, it looks as if the datasheet would be invaluable to anyone porting Forth to the Pi. I'm hoping that Frank Sergeant will port his Riscy Pigness Forth implementation to the Pi at some point; it would be both useful and instructive, and the intended school-age audience would get great value from it.
Monday, 6 February 2012
Daleketta and the Robot Cake Trolley
I recently met a bright and friendly group of trainee engineers in BBC North Lab at MediaCity, Salford. They kindly showed me a couple of things they'd done in their '10% time', which allows them to work on things that are vaguely relevant but not directly related to their current projects.
One of them - Daleketta - got a lot of coverage recently in the National Press after a BBC North Lab Open Day. She's also featured in a BBC R&D story about Women in Technology.
Daleketta is a mobile r/c 13" model Dalek , purchased from the BBC shop and modified for wifi control. An experimental Set Top Box transmits programme details live, and Daleketta stirs into action in sync with the relevant moments of Dr Who episodes as they are transmitted.
The micro controller is an mbed, but there's room within the Dalek for a BeagleBone or Raspberry Pi. I feel another project coming on.
I also saw their robot cake trolley. It's in an early prototyping stage, but looks as if it will be fun. The biggest obstacle for it to negotiate will probably be Health and Safety :)
USB Microscope
I couldn't resist another play with the USB Microscope this morning. Here's the result - a Bank of England £20 note at 200x magnification.
The detail is amazing.
Maplin currently offer this at £39.99 but from time to time it's been on offer for about half that, and at the lower price it is fantastic value. There are warnings among the reviews about Windows drivers, but I've used the microscope with Windows 7 32-bit and 64-bit, and I'm currently using it with Ubuntu Lucid.
The only gotcha seems to be that cheese (the standard Linux webcam software) does not recognise the device if the microscope is plugged in at boot time, but it's fine if you connect it later.
Sunday, 5 February 2012
Pick and Place on a budget - Part 1
This afternoon I did a quick spike test to check out the feasibility of a project I will be starting in a few weeks' time. I'm building a low-cost pick and place device to help me solder Surface Mount Devices (SMDs).
It's becoming essential to use SMDs. The space saving over traditional through-hole components is considerable, and more and more components are only available in SMD format.
Soldering SMDs is fiddly and risky if you're young, and very difficult for someone my age. My eyes are not good enough, and nor is my dexterity. I've soldered the odd SO8 device but a micro controller would be almost impossible for me to manage.
Enter PAP, my low-cost Pick snd Place 'bot for the older developer. Commercial Pick and Place robots cost tens of thousands of pounds; manual Pick and Place workstations are cheaper, but start at a few hundred pounds. I'm hoping that mine will cost me will end up costing me a lot less.
The idea is simple. PAP use a human (me) as the main controller, aided by a USB microscope.
I'll put the PCB on the bed of a compound milling table. The table will set me back about £70, but will normally be used for machining. Above the table will be a mini-drill press with an arduino-controlled geared motor to rotate the part. I hope to pick up the component to be soldered using an improvised vacuum tool - a plastic tube with a large syringe at the far end.
The soldering process will go like this:
- Place the PCB on the compound table, and make it secure.
- Use the vacuum pick-up tool to pick up and hold the SMD component.
- Move the PCB under the component by using the compound table
- Use the USB microsope to help me locate and rotate the component
- Use the drill press to place it on the board
- Solder, release the vacuum, and celebrate!
All this will take a while to set up, but today's experiment had a less ambitious goal. I wanted to check that I could use my USB microsope with Linux. I got the microscope for £15 in a special offer from Maplins; it worked well with Windows, but I no longer run Windows at home so I needed to try it out on my workstation, which runs Ubuntu Lucid.
I installed cheese, the standard USB Webcam software for Ubuntu, and the USB microscope worked right away. Here's a photo of a PCB at about 100x magnification. Focus isn't perfect but the detail is amazing.
There's much more to do before I can test PAP for real, but the USB microscope should work really well.
Subscribe to:
Posts (Atom)