Posts

Showing posts with the label Jetson Nano

Timings and Code for Spiking Neural Networks with JAX
Image
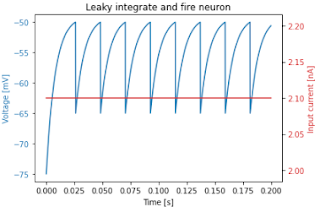
 I've been encouraged to flesh out my earlier posts about JAX to support  27DaysOfJAX . I've written simulations of a Leaky Integrate and Fire Neuron in *Plowman's* (pure) Python, Python + numpy, and Python + JAX. Here's a plot of a 2000-step simulation for a single neuron: Plot for a single neuron The speedups using Python, Jax and the JAX jit compiler are dramatic. Pure Python can simulate a single step for a single neuron in roughly 0.25 µs. so 1,000,000 neurons would take about 0.25 seconds. numpy can simulate a single step for 1,000,000 neurons in 13.7 ms . Python, JAX + JAX's jit compilation can simulate a single step for 1,000,000 neurons in 75 µs . Here's the core code for each version. # Pure Python def step(v, tr, injected_current): spiking = False if tr > 0: next_v = reset_voltage tr = tr - 1 elif v > threshold: next_v = reset_voltage tr = int(refactory_period / dt) spiking = True else...

Controlling a Raspberry Pi Pico remotely using PySerial

Image
Update : I'm using thie code below in another project, and found that I had not correctly fixed the reported bug. The new version passes automated tests, and I am pretty sure it works OK. I have changed the name of the class to Talker  since it can both send and receive information. Apologies to all concerned for the bug! Introduction You can use a Raspberry Pi Pico as a powerful peripheral to a host - a Raspberry Pi, a Jetson Nano, a laptop or workstation. In this article you'll see how to interact with a Pico running MicroPython or CircuitPython by writing some Python code that runs on the host. The software is easy to use. It enables you to send a Python statement to the Pico and read the results. The statement can be any valid MicroPython code. Setting up the host and the Pico For this article I've used a Raspberry Pi as the host, but any computer running Windows, Linux or Mac OS will do so long as it has Python 3.5 or later installed. In particular, you can use this t...

An Adafruit proto Bonnet for the Raspberry Pi, Jetson Nano and Grove I2C

Image
babelboard bonnet Adafruit's protoBoards lets you make a bread-boarded design permanent, and Seeed Studio's Grove system lets you wire up a prototype really quickly. In this half-day project I combined the two to create a simple, cheap, flexible prototyping system for the Raspberry Pi and Jetson Nano The Grove system is based on standard 4-way connectors which can be used to connect digital, analogue and I2C-based components. I've focused on I2C since most of the robots I build use I2C to interact with their environment. I mentioned the Jetson Nano - a hot topic at the moment, as NVIDIA have just announced a low-cost 2 GB version of the Nano which will be available at the end of the month. One of the clever features of the Nano is that it has a Pi-compatible header, so the bonnet will work on the Nano without modification. Fritzing the design I started by laying out an Adafruit bonnet design using Fritzing. The design is really simple. All it does is connect the pins of the...

I2C and SPI on the micro:bit; additions to the babelboard range

Image
micro:bit Keypad using I2C+ MC23008 For some reason there's not a lot on the web about using I2C and SPI with the BBC micro:bit. The I2C and SPI protocols allow single board computers like the micro:bit, the Raspberry Pi and Jetson Nano to drive hundreds of different types of useful peripheral chips. There are lots of widely available drivers for the Raspberry Pi, the Arduino and  Adafruit boards. I've seen fewer for the micro:bit, and I have started writing some more as part of my babelboard project . I am also building a babelboard for the micro:bit. The babelboard project Babelboards allow you to connect a range of I2C and SPI devices to several popular single board computers. The image on the right shows an mcp23S08 reading a hex keypad driven by a micro:bit using SPI. The micro:bit babelboard allows you to connect Grove I2C devices and the Quick2Wire port expander and analog boards. You can get adapters that connect Grove to Qwiik , so you can also con...

Totem - the Meccano replacement for 21C Makers

Image
Totem kit Totem and Pimoroni have combined forces to make my Christmas very early this year! Earlier this month I discovered Totem Maker kits . I bought a 2 wheel drive bluetooth robot and was delighted at how easy it was to assemble and drive. Totem are based on Vilnius, but my first order arrived quickly. I have a couple more robot designs in the pipeline and decided to use one of the larger Totem kits for prototyping them. Some of the kits are now stocked by Pimoroni , so I ordered one, along with the extra components I needed for the next robot. The kit appeared the next day. Instructions   The Totem kit is beautifully packaged and the instructions are outstanding: visually attractive, clear and easy to follow. I'll report on progress as I work on the robot design. I'll be showing the end result at next month's Margate Raspberry Jam and at the London Arduino Maker day in March. I'll post more details here as they become available. Jetson Nano U...

Benchmarking process for TF-TRT, and a workaround for the Coral USB Accelerator

Image
A couple of days ago I published some benchmarking results running a TF-TRT model on the Pi and Jetson Nano. I said I'd write up the benchmarking process. You'll find the details below. The code I used is on GitHub . I've also managed to get a Coral USB Accelerator running with a Raspberry Pi 4. I encountered a minor problem, and I have explained my simple but very hacky workaround at the end of the post. TensorFlow and TF-TRT benchmarks Setup The process  was based on this excellent article , written by Chengwei Zhang . On my workstation I started by following Chengwei Zhang's recipe. I trained the model on my workstation using and then copied trt_graph.pb from my workstation to the Pi 4. On the Raspberry Pi 4 I used a virtual environment created with pipenv , and installed jupyter and pillow . I downloaded and installed this unofficial wheel . I tried to run step2.ipynb but encountered an import error. This turned out to be an old TensorFl...

Training ANNs on the Raspberry Pi 4 and Jetson Nano

Image
There have been several benchmarks published comparing performance of the Raspberry Pi and Jetson Nano. They suggest there is little to chose between them when running Deep Learning tasks. I'm sure the results have been accurately reported, but I found them surprising. Don't get me wrong. I love the Pi 4, and am very happy with the two I've been using. The Pi 4 is significantly faster than its predecessors, but... The Jetson Nano has a powerful GPU that's optimised for many of the operations used by Artificial Neural Networks (ANNs). I'd expect the Nano to significantly outperform the Pi running ANNs. How can this be? I think I've identified reasons for the surprising results. At least one benchmark appears to have tested the Nano in 5W power mode. I'm not 100% certain, as the author has not responded to several enquiries, but the article talks about the difficulty in finding a 4A USB supply. That suggests that the author is not entirely...

An excellent course for Jetson Nano owners

Image
Jetson Nano Regular readers will know than I'm a keen Jetson Nano owner. Recently I posted a series about how to started with the computer but NVIDIA have now published an excellent course,  ' Getting Started with the Jetson Nano ', which is  free for members of the NVIDIA developers' program. The course comes with a pre-built image which can run the Nano in headless mode. That's very useful - I had to buy a new monitor to get going, as none of my old monitors had native HDMI support. The image provide with the course just needs a Nano and a Laptop or Desktop computer with a USB port. The course is a great introduction to deep learning with a GPU. Once you've completed it you may want to delve deeper; there are lots of excellent Deep Learning courses available on-line, and many of them use Google's Colab for practical sessions. Google Colab gives you free access to top-of-the range NVIDIA hardware, and if you want to run your trained models l...

Another free tool for Jetson Nano users

Image
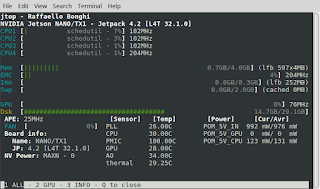
jtop outout Raffaello Bonghi, one of the members of the unofficial Jetson Nano group on FaceBook has published jetson-stats , a toolkit for Jetson users. jetson-stats works on all the members of the Jetson family. My favourite program in jetson-stats is jtop. It's a greatly enhanced version of the linux top command. jtop shows a very useful real-time view of CPU and GPU load, memory use and chip temperature. Find jetson-stats on GitHub , or install it via pip/pip3.

Five steps to connect Jetson Nano and Arduino

Image
Yesterday's post showed how to link a micro:bit to the Jetson Nano. One of the members of the (unofficial) NVIDIA Jetson Nano group on Facebook asked about connecting an Arduino to the Jetson. Here's a simple recipe for getting data from the Arduino to the Jetson Nano. It should work on all the Jetson models, not just the Nano, but I only have Nanos to hand. On request, I've added a recipe at the end of this post which sends data from the Jetson Nano to the Arduino; it turns the default LED on the Arduino on or off. The recipe for sending data from the Arduino to the Jetson has just 5 stages: Program the Arduino. (I used the ASCIITable example). Connect the Arduino to the Jetson using a USB connector Install pyserial on the Jetson Download a three-line Python script Run the script.   Programming the Arduino I used an Arduino Uno, and checked it on a verteran Duemilanove (above), but any Arduino should work. You'll need to do this step usi...

Getting Started with the Jetson Nano - part 4

Image
I'm amazed at how much the Nano can do on its own, but there are times when it needs some help. A frustrating problem... Some deep learning models are too large to train on the Nano. Others need so much data that training times on the Nano would be prohibitive. Today's post shows you one simple solution. ... and a simple solution In the previous tutorial , you went through five main steps to deploy the TensorFlow model: Get training data Define the model Train the model Test the model Use the model to classify unseen data Here's the key idea: you don't have to do all those steps on the same computer . Saving and Loading Keras Models   The Keras interface to TensorFlow makes it very easy to export a trained model to a file . That file contains information about the way the model is structured, and it also contains the weights which were set as the model learned from the training data. That's all you need to recreate a usable copy of th...

Getting started with the Jetson Nano - part 3

Image
Jetson Nano image courtesy of NVIDIA/Pimoroni In part 2 of this series you prepared your Jetson Nano for software installation. In this part you'll install Jupyter Notebook, Jupyter lab, TensorFlow and some other software that is needed to run the first TensorFlow notebook. Once started, you can leave the software installation to run; it takes about an hour on a Nano in 10W power mode. It probably takes a little longer if you're using a 2.5A supply. There's a final manual stage which takes a couple of minutes. When that's complete you'll be able to work through the TensorFlow example, training a Neural Net to recognise item images from a Fashion database and then testing it in previously unseen images. Here's what you'll do, in a little more detail. Installing the software Open a terminal window on the Nano  (A short-cut,  crl-alt-T should do it). You'll be in your home directory; type git clone https://github.com/romilly/nano.g...

Getting Started with the Jetson Nano - Part 2

Image
Learning with the Nano This is the second in a series about getting started with the Jetson Nano. Part 1 is here . It's taken a while, but I now have a simple, repeatable set-up process for installing and running TensorFlow on the Jetson Nano using Jupyter Notebooks. It's simple and repeatable but slow . Jupyter Notebook saves a lot of time and angst once it's available but it takes a while to install. Fortunately I now have a script that automates the installation so you can go away and drink a coffee while the installation runs. Before you can install the software, though, you need to complete the installation of Ubuntu. That's what this post covers. My first post about the Nano described the hardware you need and pointed you to instructions that explain how to prepare your SD card. Once you've got your hardware and have prepared the SD card, it's time to fire up the Nano. Getting ready Plug in the HDMI cable, the Ethernet cable, the keyboa...