Posts

Showing posts with the label robotics

Bill of Materials for Anastasia - build instructions coming soon.

Image
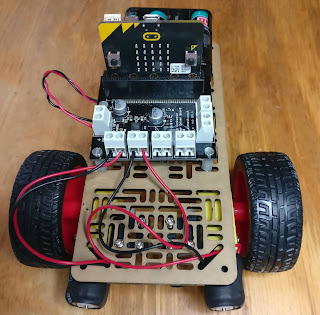
I've added a Bill of Materials for Anatasia the home brew micro:bit robot in her GitHub project . They are in the project README. I'll add building instructions here and on GitHub over the week-end. Meanwhile, here is a video showing her in action:

Controlling Anastasia from a second micro:bit

Image
This is the third in a series of four articles about Anatasia, a home-brew micro:bit based robot. Here's the full list of articles: 1. The original article introducing the robot. 2. A short update when I released the code on GitHub. 3. This detailed walk-though of the controller code. 4. A detailed walk-through of the code that runs on the robot .  The code for Anatasia and her controller is finished. It's simple and it's all working well. You control Anastasia via a separate hand-held micro:bit, which communicates using the micro:bit's built-in radio. You tilt the controller and Anastasia responds by advancing, retreating or spinning to the left or right. Anastasia stops when you hold the controller level. Here's the controller code: Controller Code   The controller code starts with a bit of set-up from microbit import * import radio radio.on() # The critical value for tilt detection. # A lower value makes the controller more sensitive. ...

Anastasia is a simple home-brew robot - now on GitHub

Image
Anastasia V1 Anastasia (my latest home-brew robot) is now on GitHub . The code is described in a series of articles on this blog. I've listed them at the end of this post. I've made rapid progress with Anastasia and will do more work on her today. Anastasia is currently driven by a pair of micro:bits. The motor is managed by an on-board micro:bit connected to a Kitronik motor controller and I control Anastasia over radio using a second micro:bit. Anastasia is working, but needs some minor enhancements to the code and electronics. I may also need to replace the motors which run a bit unevenly. Once I've done the upgrades I'll post a video of Anastasia in operation. Soon I'll replace the on-board micro:bit by an Adafruit clue which will be controlled via Bluetooth. Eventually I'll add an on-board camera. Articles in this series: 1. The original article introducing the robot. 2. This short update. 3. A detailed walk-though of the controller c...

Raspberry Pi and BBC micro:bit for C2Pi

Image
Right now the Raspberry Pi and the BBC micro:bit look like a winning team. If you're f ollowing this blog you will know that I am evaluating new hardware and software for C2Pi (the re-generated C3Pi, neé Trackbot). Over the weekend I discovered that the micro:bit now supports MicroPython. Since I am looking for a micro that supports a language with a REPL, I had to investigate. MicroPython on the pyboard I've been a fan of MicroPython for a while. It runs on several platforms, including a custom board (the pyboard). I first met the pyboard, and Damien George, (its designer, and the original implementer of MicroPython) at an Open Technology conference in Cambridge a couple of years ago. I learned that MicroPython is a full, optimised implementation of Python 3; the only difference lies in MicroPython's specialised libraries, which  focus on direct access to the hardware. At the time I felt that the pyboard and MicroPython had great potential but I couldn...

C3Pi: The Teensy and Motor Driver are talking

Image
C3Pi Teensy 3.0 and Motor Driver At the end of the previous post I let myself get a bit carried away! C3Pi has always used a Solarbotics motor driver. In the past it's been controlled by an Arduino Pro Mini. While the software for the Teensy is very similar, I needed to make a couple of changes to the code and more significant changes to the pinout. Slow and steady So my rush to solder up some stripbaord was premature. I've breadboarded the circuit instead. I've now got the Teesny 3.0 controlling it, and the Teensy is controlled by serial input. Since I've already checked that the Pi can drive the Teensy's serial port, I'm ready to go. Tomorrow's plan Tomorrow I will prepare the stripboard, connect the motors and take C3PI for his first outing. Initially I will control C3Pi via ssh over wifi. Come back tomorrow to find out how the project is going. If you want to meet C3Pi in person, come along to this Saturday's Southend Raspberry J...

C3PI: the Pi and Teensy are talking

Image
The Pi and the Teensy are talking. The Teensy is running the fortune cookie sketch. I've been using pyserial on the Pi, and using interactive python. Here's a screenshot of an ssh session on the Pi: Next Step Next I'm going to solder up a mini-stripboard for the Teensy.

C3Pi gets a wifi update

Image
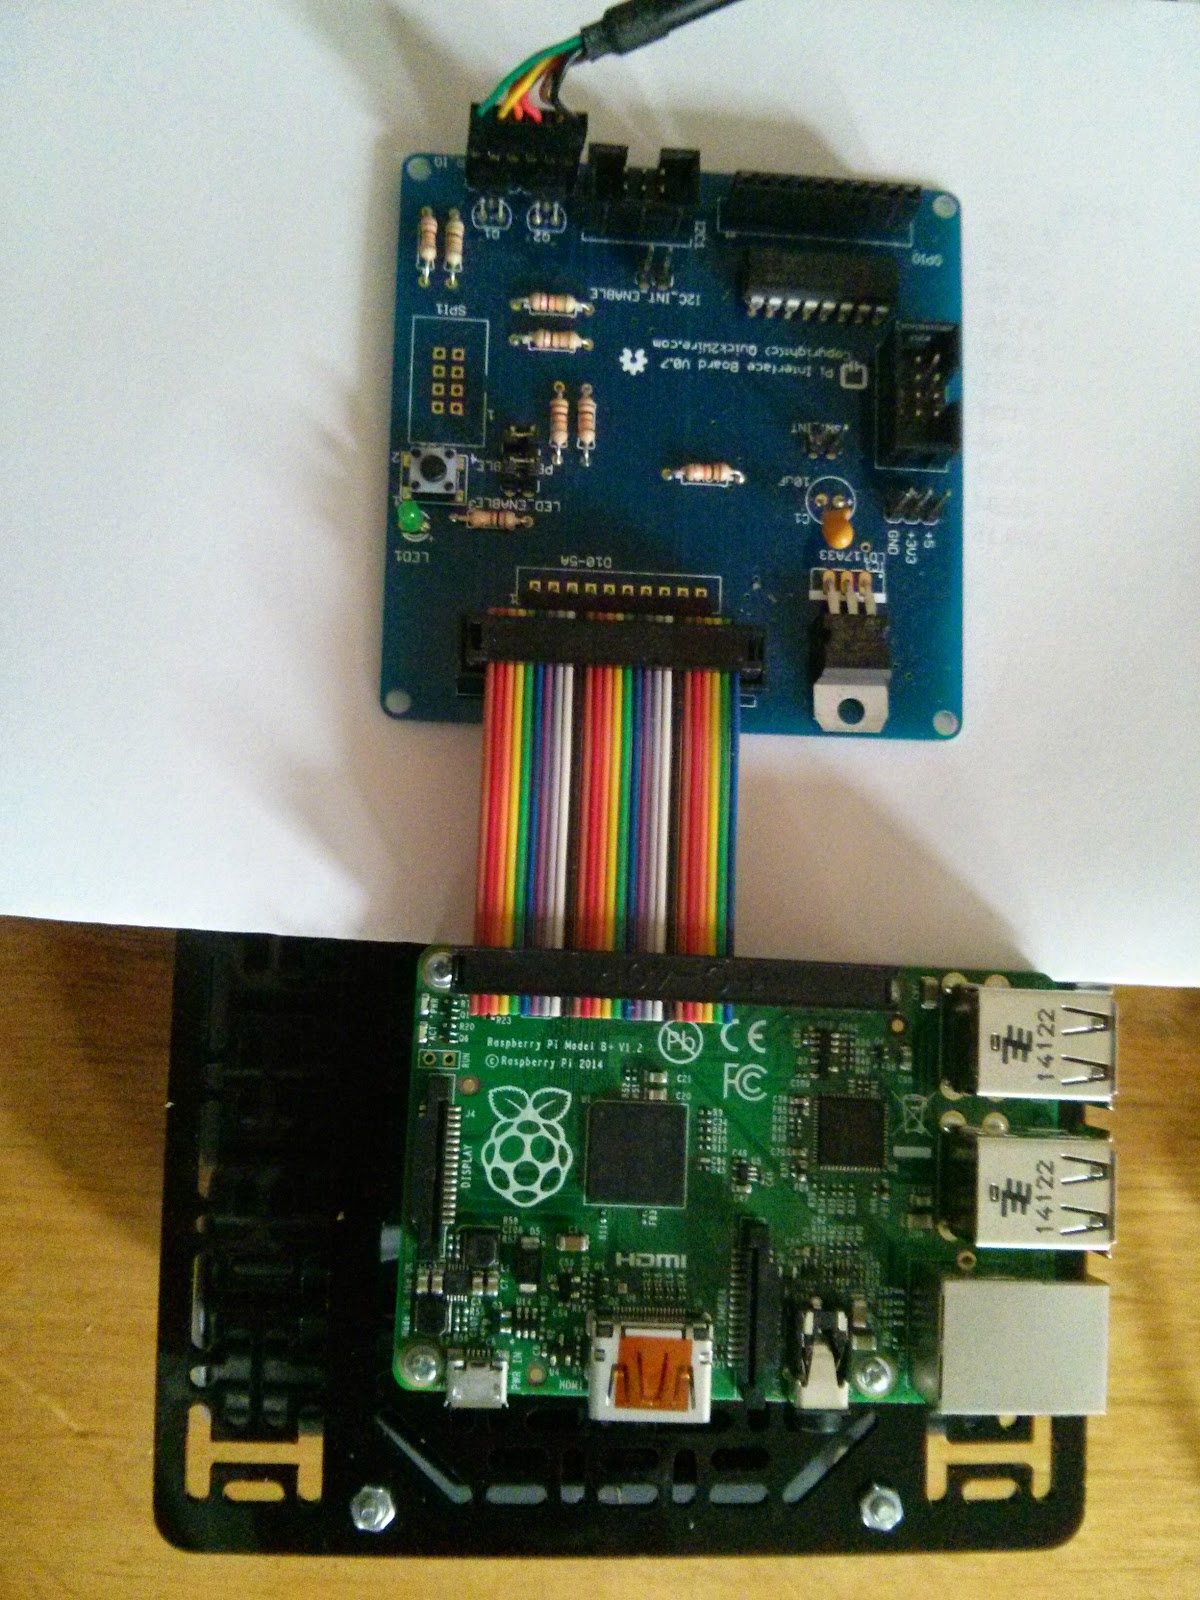
C3Pi B+ Pi, Quick2Wire board and downverter I'm busily working on C3Pi ready for his outing to the Raspberry Jam at Southend this Saturday. I'll be setting up my own mini-wifi network, but sometimes wifi doesn't work as it should. I need a way of configuring the Pi that doesn't rely on networking, just in case. When the Raspberry Pi model B+ first came out I built a  downverter - a cable which links the 40-pin header on the B+ to the old-style 26-way connectors. I linked it to a Quick2Wire interface board and plugged in an FTDI cable, which I connected to my laptop's serial port. Once I'd installed gkterm on the laptop I could log in to C3Pi using the serial console. So now I have a safety net! I don't think I'll need it, as I've also got the laptop, my phone and C3Pi chatting away happily on the private network, but it's good to know I've got options. I'm hoping to control C3Pi via a tablet or phone at the Jam, and for the ...

C3Pi gets a Raspberry Pi B+ and a face lift

Image
C3Pi+ C3Pi , the tracked robot that I've been working on for several years , just got a new brain: a Raspberry Pi model B+. The old version used a Model B with an Arduino micro. This one will probably use a Teensy 3.0 as the Pi's companion. (Less) Power to the Raspberry Pi The main reason for upgrading the Pi is the reduced power consumption, but the extra mounting holes also appealed. I took the opportunity of replacing C3Pi's old stripboard top with a proper pololu board, and the result looks much neater. I've added the motor controller which also provides a regulated 5v supply. My next job is to make a small circuit board to hold the Teensy and provide connection points to the Pi and the controller. C3Pi at Southend - Saturday 12 August C3Pi will be making an appearance at Southend this Saturday. The Southend Raspberry Pi Jammers are holding a big summer meeting, and C3Pi will be one of the many attractions. Book your tickets here !

Countdown to Thursday - three days to go

Image
I'm racing ahead with preparations for this Thursday's Kids Adore Ditch . I've already had one small problem to overcome. Poorly 3pi When I looked closely at my 3pi on Friday I realised that the mounting bracket of one of the motors is broken. I've ordered a replacement but it will not arrive until Wednesday at the earliest. I had two 3Pi  demos in mind, and I'm a bit wary of reprograming on the day, so I decided it was time to get a second robot. HobbyTronics offered the best price, and for an additional charge I asked for delivery on Saturday Morning. The new robot arrived on time and I started to prepare the demo. Great documentation from Pololu It's been a while since I did anything with these robots, so I needed to remind myself about how to program them. I love the documentation on the Pololu web  site: it's simple, clear and correct, and covers Windows, Linux and OS/X users. I have the GNU gc++ avr cross compiler and avrdude installed on ...

Putting the 'See' in C3Pi

Image
At last C3Pi can see , thanks to the wonderful Raspberry Pi camera module. You're squinting, C3Pi His first attempt at photography isn't going to win any prizes for composition, but no doubt he will get better with practice. I need to add a robust holder for the camera, but it should mean that we can take some photos at the Kids Adore Ditch event on Thursday. If we're really lucky we may even have streaming video.

C3pi (a.k.a. Trackbot) is back in town

Image
C3pi, a veteran robot of my own design, will be joining the Pololu 3pi and me at Kids Adore Ditch this coming Thursday. C3pi a.k.a. Trackbot Trackbot started out as an Arduino-controlled robot . I added a Raspberry Pi , and he became C3Pi. An additional WiFi dongle on the Pi allows me to control him remotely. C3Pi has made several public appearances over the years, and I hope he'll perform well on Thursday. He has one weakness; his batteries are buried in his tummy, so when they run out he needs major surgery. One day I'll come up with a better solution, but probably not this week!

The Pololu 3pi gets ready for the Ditch

Image
I'm going along to Kids Adore Ditch next Thursday, and this 3pi robot from Pololu is going with me. Pololu 3Pi The 3pi comes ready-built, it's capable, and it's widely available. Its one drawback is that it's relatively expensive, and you need a programmer if you want to run anything other than the fairly limited demo program. I'll take a couple of less expensive alternatives along as well.

Wildcat rides

Image
I've just come across this amazing beast  on Hackaday: I suspect that there are some heavy-duty pneumatics buried in the body. I wonder how close one could get using a much, much smaller body and conventional servos.

Gertboard - expansion board for Raspberry Pi

The Gertboard is coming - a capable, inexpensive expansion board for the soon-to-ship Raspberry Pi. The Gertboard is will make it much simpler to interface the Raspberry Pi to the outside world. It provides  access to the Pi's GPIO pins, and can include a motor driver. Gert van Loo of Fen Logic Ltd , the board's designer, will publish all the design documents once the design is stable. Raspberry Pi expect to sell a bare board in their shop. That means that you'll need to buy the components yourself, program the on-board PIC if required, and solder the components. Since many of the components are SMT (surface mount) you will need to be a proficient constructor to assemble your own board. Gert hopes that someone will start making per-build boards. I suspect there will be quite a market once the Pi starts to shop in volume next year.

Let's make robots

Image
I just re-discovered Let's Make Robots - a site for robot builders to show off their work, exchange ideas and learn from others. It looks like a great resource with a friendly community. If you're a robot-builder, take a few minutes to register and post details of your robotic creations.

Another slithering soft robot

Image
Soft robots keep popping up (or slithering along) all over the place. I'm beginning to think I ought to take a closer look at the technology in my copious free time. I wonder how well a combined crawler/gripper would function underwater.

Pololu I2C Gyro, accelerometer and compass

Image
My black Friday Pololu order arrived this morning. I'm delighted with the purchase, and one item in particular has blown me away. It's a MiniMU-9 , which combines a triple-axis gyro, a triple-axis accelerometer and a triple-axis magnetometer. In other words, it measures all the data you need to work out the position and orientation of a mobile robot. And it's tiny. To give you a feeling of its size, the connector holes in the image are 0.1" apart, and it weighs just under a gram. Now if only I had a small, low-cost lightweight, Linux-capable board to control it, I could build an autonomous blimp. But that's just Pi in the Sky  :) Seriously, the Raspberry Pi (described in the Register article linked to above) is well-suited to the job of managing an autonomous blimp. It's true that the gumstix is even smaller than the Pi, and available this month rather than next; but it costs a lot more. Meanwhile I have projects stacked up that will keep me occu...

Pololu Black Friday offers include mbed-based robot

Image
Like many US retailers, Pololu are offering massive Black Friday discounts on a range of their robotics products. Some of the bargains: 33% off the m3pi mbed- based mobile robot (you will need to get your own mbed) 50% off a pair of wixels 30-60% off various motor controllers 40% off the MinIMU-9 Gyro, Accelerometer, and Compass The last item looks perfect for an autonomous vehicle/aircraft navigation system. There are also flat discounts available, depending on the size of your order; these can be combined with the individual product discounts. I just saved $150 on a $350 order. One thing to take into account: if you're buying from outside the USA you will have to pay local taxes and a processing fee to the shipping agent when the goods arrive. The offer is time-limited, and will expire  at 11:59 PM PST on Monday, November 28 (7:59 AM GMT on Tuesday, November 29).

Young inventors at Google

Yesterday Google hosted a qualifying tournament for the Bay Area First Lego League ( FLL ) at their Mountain View Headquarters. Imagine the excitement of the 9 to14 year-olds as they arrived at Google headquarters. They will remember the event for the rest of their lives, and who knows what they will achieve in the years to come. At a time when news is full of economic gloom, it's great to see the excitement and creativity of the young, who are living at the start of a golden age of maker technology.

Bluebot-L the retired veroduino robot

Image
Bluebot-L We learn by our mistakes, but it can be cheaper and less painful to learn from the mistakes of others. Here's one of my mistakes; I hope the story will save you time and money. A few months ago I started work on a wheeled robot based on Veroduino - an Arduino clone build using Vero strip board. I had a wheeled base which contained a couple of geared motors. They drew a fairly low current so I decided to use a TC4427A h-bridge controller on a shield-like board that sat atop the ATMega326 micro controller. I decided to use separate power supplies for the controller and the motors;  I bought a couple of battery holders, each taking 4 AA cells. I used foam plastic for the base; it's easy to cut and drill,  and it's lightweight, but strong enough for the job (so long as it isn't crushed). Construction was rapid and I soon got to the point where I could try it out on a simple line-following exercise. Disaster! The b...