Posts

Showing posts with the label prototype

3 Simple steps to test your new Arduino Clone:

is your brainchild going to work? You've built your latest (or maybe your first) Arduino clone. It might be breadboarded , on stripboard , or a PCB . You've visually checked the connections, over and over, and maybe done some quick continuity checks with a multimeter. Everything looks fine. But will it actually work? Follow these steps to check it out. Use blink - The Secret Sauce Here's my secret sauce for building testable clones: Use a chip that has both a bootloader and the standard blink sketch pre-loaded . Use a 5V LED for testing. Let's look at those in a bit more detail. Use a chip that has both a bootloader and the standard blink sketch pre-loaded When you test your clone with a pre-prepared chip, you're starting with a known good core component. If the blighter doesn't blink you know you've made a mistake in the wiring. For more detail on why this is a goo idea on courses, see here . A 5v LED is the tester's friend Many make...

PCB design - Eagle and Fritzing

Image
Yesterday I got involved in a couple of discussions on Twitter on two related topics: choosing software for PCB design, and choosing PCB Fab companies to make short runs of prototype boards. I'll write a little about the PCB Fabs in another post. At the risk of having to don flame-proof safety gear, I'll share some of my experience from the last couple of years, and my current preferences. Quick2Wire Analogue Board Disclaimer Please don't expect an exhaustive survey. I don't normally work on Windows, and I don't have a Mac, so this is written from the perspective of a Linux user. That's why I have not tried DesignSPark PCB. Nor have I looked much at KiCad, simply because my first attempts some while ago were discouraging. Eagle and Fritzing The two products that I have used are Eagle and Fritzing. Eagle is very well established as a design tool for amateur and professional users. It's very capable, and has very extensive libraries. Since CAD...

The lobstar - An OSH, low-cost, breadboard-friendly Arduino-compatible clone

Image
There's a revolution underway in Computer Science education. The Raspberry Pi has generated a huge amount of energy and enthusiasm, but there's also a lot of interesting activity around the Arduino. One great Arduino resource is the Shrimp, a low-cost compatible design aimed at educators and hobbyists with limited budgets. Landing the Shrimp You can find out more on the Shrimping It  blog. It describes ' the Shrimp  – a substitute for the Arduino Uno, which can be constructed for about a tenth of the price of the official board, shown here in stripboard and breadboard versions.' Note the absence of a PCB version! That's deliberate: the idea is that you will lean more, and feel more of a sense of ownership, if you have constructed the shrimp from scratch. That makes sense but I can see two situations where shrimp-catchers might prefer a PCB to work with. Some beginners starting out on their own might feel more confident building a PC...

Text LCDs and the Raspberry Pi - continued

Over the weekend I spent some time on the LCD text display using the LiquidCrystalFast library. There's still work to do, but the core hardware is working. When I've finished the hardware and software I'll post the details but first I thought I'd document the mistakes I made and the processes I followed to troubleshoot the project and get it back on the rails. My normal workflow for a new hardware design takes things in small steps, with lots of testing as I go. I start with a rough design, which may be on paper or in my head, and then I breadboard and test. Once the breadboarded version is working I transfer the design to stripboard or to one of Adafruit's wonderful PermaProto boards , and test again. If appropriate, I then design a board and send the files off to a PCB fab shop to make the first PCB version, which may need further testing and revision. My First Mistake This time I took a short cut. I've built a dozen or so Arduino clones on stripboa...

Arduino on a budget - part 7

Image
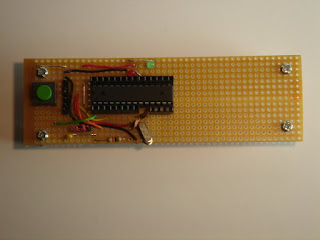
My Veroduino is compact, cheap and easy to use. The Mk 1 is a little fiddly to construct; I hope to build Mk 2 as soon as the components arrive. The two strips alongside the microprocessor (MPU) allow you to link plugboard components to any MPU pin. The male jumper to the left of the MPU allows you to provide power from a FTDI USB TTL cable , and to program the device using the Arduino development environment. The pushbutton resets the MPU; you need do a manual reset while programming. Timing the reset is a matter of trial and error. I will buy and build a USB breakout board soon. That should perform an auto-reset when programming. The boad is built on a type of Vero stripboard which has a central break in all the coper trackes. This is ideal for boards which carry Dual-in-line chips like the MPU. The board layout is very simple, with only five manual strip breaks needed. Four of the breaks are underneath the jumper for the FTDI cable. The outside jumper pins are soldered to stipboard ...

Arduino on a budget - part 5

Image
Introducing the Veroduino The Veroduino is inspired by the Paperduino , Adafruit's Boarduino and Oomlout's Breadboard Arduino Compatible Kit . I built it on a length of Vero's 01-0171 stripboard . It's a narrow board with a central gap in the conductive strips. It's perfect for DIL components. I used Oomlout's Arduino Compatible Component Bundle and a set of stackable headers . The Veroduino Mk 1 has room for a 5v regulated power supply but for now I am using the FTDI USB TTL serial cable from Oomlout to program the board and to provide power. Veroduino Mk 1 almost fits on the stripboard but the Crystal overhangs the edge by about a millimeter. Mk2 will use a ceramic resonator and should be both cheaper and smaller. The cost of the Veroduino is under £15 inc VAT. You will also need a serial cable (£15.50 inc VAT). Oneof these can be used to program as many Veroduino boards as you want. You can develop and download software to the Veroduino using the Arduino d...

Arduino on a budget - part 2

Image
I've made good progress with Veroduino - the Arduino clone I'm building on Veroboard™*. I like to build up complex circuits from pluggable components. They are easier to test, easier to replace, and can often be used in more than one project. I started by building a pluggable power supply on a small piece of strip-board; it contains a 5v regulator, and includes a bridge rectifier to provide polarity protection. Next I started on the board that carries the micro-controller. I abandoned my first prototype; the strip-board turned out to be too wide, covering the breadboard pads that connect to the pins of the micro-controller. I didn't feel too bad about that; the reason that I prototype is to discover design flaws early. I also verified that my mechanical design plugged into the board correctly. It's tempting to use PCB header pins, but they don't play well with this design. They work really well with a two-sided PCB, because the header can be soldered from the top. ...

Arduino on a budget - part 1

Image
Readers will know that I'm a fan of the Arduino, as is my daughter Alex . We currently share an Arduino board. I'm in the middle of a lengthy project, and I don't want to delay her access to the board. The obvious solution is to get a second Arduino. An Arduino Duemilanove board costs about £25 in the UK , and I'd prefer not to spend that much. Luckily the Arduino is open source, so lots of companies have developed their own versions. One popular alternative is the Boarduino from Adafruit , shown above. It's an Arduino clone with a much smaller footprint. You can't use standard Arduino Shields, but you can plug it into a breadboard - hence the name. If you're based in the UK .:Oomlout:. currently offer the Boarduino for £13.50 . I'd willingly spend that much, but a quick web search turned up two even cheaper possibilities; the Paperduino and the Stripboard Arduino . The Paperduino is a cool idea, but I'm looking for something a bit more robust, a...