Posts

Showing posts with the label Lazydoro

How to write reliable tests for Python MQTT applications

More and more IoT applications use MQTT. It's a simple and very useful messaging framework which runs on small boards like the Raspberry Pi Pico as well as systems running under Linux, MacOS and Windows. I recently decided to add some extra functionality to Lazydoro using MQTT. The code seemed to work when run manually but I had a lot of trouble getting my automated tests working. It took quite a while to understand the problem, but the fix was simple. Intermittently failing tests are bad In the end-to-end test that was causing the problem, the code simulated the start of a pomodoro session and then checked that the correct MQTT message had been  sent. The test usually failed but sometimes passed. When I manually ran a separate client that subscribed to the message stream I could see that the right messages were being sent. Intermittently failing (or passing) tests are a nuisance. They do nothing to build confidence that the application under test is working reliably, and they are ...

Make your own strip-board breakout boards

Image
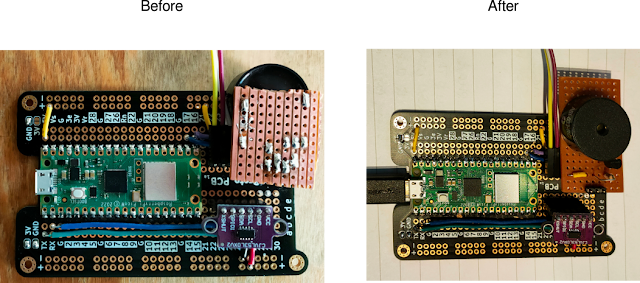
A useful trick for Makers In this article you'll see when you should build your own breakout boards, and you'll learn a useful trick to use when making them. Breakout boards rock Digital Makers can often make projects faster by using breakout boards. A breakout board is a small but useful module that you can use to compose your project. There are hundreds of breakout boards available. Many are based on tiny SMD chips that are tricky to solder. You can save time and reduce the risk of mistakes by buying a ready-made breakout board. Here's an Adafruit breakout board I used in the Raspberry Pi version of Lazydoro. Of course, you can only buy a ready-made board if you can find one that does what you need, If there isn't, consider making one! Why bother with self-built breakouts? Why not just put everything you need on the main project board? There are advantages to a design that uses pluggable modules. You can usually test the module on its own, and th...

Ports and Adapters - Struggling back to Beginner's Mind

Image
I have to admit it: I've been struggling over the last two days.  I'm working on a write-up of a Walking Skeleton for Lazydoro, together with sample code for its Ports and Adapters architecture. I often create a Walking Skeleton at the start of an application. Lazydoro is now in its fifth version,  there's already a finished working version, and it's difficult to 'un-know' how it evolved. Trying to create what I might have written at the start has been quite a challenge The process has been valuable, though. I think I understand  Ports and Adapters  better through working on my sample code and explanation, and it's had another benefit. I've set up an automated deployment process which I'll be able to use for future MicroPython projects. Automating deployment Some applications can be deployed as a single file, but small modules are easier to read and test. lazydoro now consists of 9 files in a three-directory tree, and deploying a new version manua...

Lazydoro is working again!

Image
Yesterday things looked tricky. I realised this morning that I could easily fix the problem I've been having with lazydoro and my new chair. Doh! All it took was an adjustment to the distance threshold. Lazydoro is now sitting by my keyboard and keeping a watchful eye on me. lazydoro back at work Next steps: keep a log of Pomodoros completed/broken.

Lazydoro Mk 3 - lots of automated tests for a simple design

Image
At the end of  yesterday's post lazydoro was running on a Pi zero still not working reliably. In November 2021 I worked on Ness Labs ' Write a book in 30 days challenge. I had to rely on a web-based Pomorodo timer, and thought I'd have another try at the lazydoro project. I decided to rewrite lazydoro from scratch. Lazydoro needs to do four things. It needs to know when I arrive at or leave my desk It needs to keep track of passing time It needs to know where I am in a Pomodoro cycle It needs to provide feedback to keep me on track. To make lazydoro easy to test I used a variant of the Ports and Adapters architecture. (Ports and Adapters is sometimes called Hexagonal Architecture). I first came across it in an article by Alistair Cockburn , and it made a lot of sense. It's also featured in the GOOS book: Growing Object Oriented Software Guided by Tests . Simple architecture Here's the architecture for lazydoro: At the centre is the applicat...

Lazydoro migrates to the Pi

Image
In the previous blog post I described cushadoro and its successor, lazydoro Mk 1. That was the first version of lazydoro, implementedin CircuitPython and based on the Adafruit Trinket M0. Today I'll describe the next stage of the project, a Raspberry Pi-based version. I made real progress but, as you'll see, lazydoro was still not quite good enough. Lazydoro needed unit tests At the point were we left the project the Python code had become a little complicated. I thought I ought to do more automated testing. It's possible to do that on CircuitMpython devices like the Trinket M0, but it's a lot easier if you canuse the standard Python libraries, including Python's unittest and mock frameworks. I decided to migrate the project to a Raspberry Pi. Moving to the Raspberry Pi Explorer HAT prototype At the time I migrated the project I had just fallen in love with Pimoroni's brilliant Explorer HAT pro . The HAT has loads of useful peripherals, an...

Totem - the Meccano replacement for 21C Makers

Image
Totem kit Totem and Pimoroni have combined forces to make my Christmas very early this year! Earlier this month I discovered Totem Maker kits . I bought a 2 wheel drive bluetooth robot and was delighted at how easy it was to assemble and drive. Totem are based on Vilnius, but my first order arrived quickly. I have a couple more robot designs in the pipeline and decided to use one of the larger Totem kits for prototyping them. Some of the kits are now stocked by Pimoroni , so I ordered one, along with the extra components I needed for the next robot. The kit appeared the next day. Instructions   The Totem kit is beautifully packaged and the instructions are outstanding: visually attractive, clear and easy to follow. I'll report on progress as I work on the robot design. I'll be showing the end result at next month's Margate Raspberry Jam and at the London Arduino Maker day in March. I'll post more details here as they become available. Jetson Nano U...