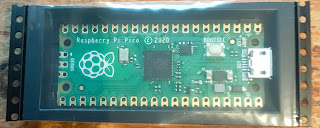
Update: I'm using thie code below in another project, and found that I had not correctly fixed the reported bug. The new version passes automated tests, and I am pretty sure it works OK.
I have changed the name of the class to Talker since it can both send and receive information.
Apologies to all concerned for the bug!
Introduction
You can use a Raspberry Pi Pico as a powerful peripheral to a host - a Raspberry Pi, a Jetson Nano, a laptop or workstation. In this article you'll see how to interact with a Pico running MicroPython or CircuitPython by writing some Python code that runs on the host.
The software is easy to use. It enables you to send a Python statement to the Pico and read the results. The statement can be any valid MicroPython code.
Setting up the host and the Pico
For this article I've used a Raspberry Pi as the host, but any computer running Windows, Linux or Mac OS will do so long as it has Python 3.5 or later installed.
In particular, you can use this technique to connect a Raspberry Pi Pico to a Jetson Nano host or any other member of the Jetson family.
The host needs to have the serial package available, so you need to run
pip3 install PySerial
on the host.
You'll need to install MicroPython on the Pico. You'll find instructions for MicroPython installation in the official Getting Started Guide which I reviewed recently.
The £10 Guide is worth buying, but if you can't wait for your copy to arrive you can download a free pdf.
The guide will also tell you how to use the Thonny editor to install the necessary code on your Pico.
Connect the host and the Pico
First, connect the host to the Pico using a USB data lead. Some USB leads only supply power. They will not work.
Install software on the Pico
Next, install the blinker
script.
The blinker.py
script runs on the Pico, but you should rename it to main.py. Here's the code:
"""
Example for remote control from host via Serial link.
This is the code to run on the Pico.
It sets up the onboard LED and allows you to turn it on or off.
"""
from machine import Pin
# use onboard LED which is controlled by Pin 25
# on a Pico W the onboad lLED is accessed differently,
# so commeent out the line below
# and uncomment the line below that
led = Pin(25, Pin.OUT) # veresion for Pico
# led = Pin('LED', Pin.OUT) # version for Pico W
# Turn the LED on
def on():
led.value(1)
# Turn the LED off
def off():
led.value(0)
Install it on the Pico using the
Thonny
editor.
- Open the gist on GitHub.
- Copy the code to your clipboard.
- Open
Thonny
and make sure it has connected to the Pico. - Paste the code into the
Thonny
editor window. - Save it on the Pico as
main.py
. - Close the Thonny editor.
If you leave the Thonny editor open it will keep the serial port open on the host, and the serial program below will not work!
Since you saved the program as main.py
it will run on the Pico automatically.
The talker.py
script runs on the host. It uses PySerial to send commands from the host to the Raspberry Pi Pico and read the result.
Here's the talker code:
import serial
class Talker:
TERMINATOR = '\r'.encode('UTF8')
def __init__(self, timeout=1):
self.serial = serial.Serial('/dev/ttyACM0', 115200, timeout=timeout)
def send(self, text: str):
line = '%s\r\f' % text
self.serial.write(line.encode('utf-8'))
reply = self.receive()
reply = reply.replace('>>> ','') # lines after first will be prefixed by a propmt
if reply != text: # the line should be echoed, so the result should match
raise ValueError('expected %s got %s' % (text, reply))
def receive(self) -> str:
line = self.serial.read_until(self.TERMINATOR)
return line.decode('UTF8').strip()
def close(self):
self.serial.close()
On the host
- Copy talker
.py
from this github gist into an editor and save it in a directory of your choice.
- In that directory, run
python3
to start an interactive session.
- Type
from talker import Talker
- Type t = Talker(). If you are running on Windows, you will need to type t
= Talker('COM6')
replacing COM6
by whatever port the Pico is visible on.
- Type t
.send('2 + 2')
- Type t
.receive()
. If all is well, this will print the result 4.
- Type t
.send('on()') #
The on-board LED on the Pico should turn on.
- Type t
.send('off()') #
The on-board LED on the Pico should turn off.
- When you have finished, type t
.close()
.
Of course in a real application you'd normally create the sender, send and receive data using a Python script. In a future post I'll show how to do that to create a simple weather station with the Pico and plot the temperature and light level on the host. Before that I'll explore other ways of connecting and controlling the Pico from a Host.
To keep up to date with this series follow @rareblog on twitter.