Posts

Showing posts with the label adafruit

Lazydoro migrates to the Pi

Image
In the previous blog post I described cushadoro and its successor, lazydoro Mk 1. That was the first version of lazydoro, implementedin CircuitPython and based on the Adafruit Trinket M0. Today I'll describe the next stage of the project, a Raspberry Pi-based version. I made real progress but, as you'll see, lazydoro was still not quite good enough. Lazydoro needed unit tests At the point were we left the project the Python code had become a little complicated. I thought I ought to do more automated testing. It's possible to do that on CircuitMpython devices like the Trinket M0, but it's a lot easier if you canuse the standard Python libraries, including Python's unittest and mock frameworks. I decided to migrate the project to a Raspberry Pi. Moving to the Raspberry Pi Explorer HAT prototype At the time I migrated the project I had just fallen in love with Pimoroni's brilliant Explorer HAT pro . The HAT has loads of useful peripherals, an...

MicroPlot on the PyPortal - progress and frustration

Image
Update: I got a fix within minutes of posing the problem on the Adafruit discord channel! Here's the correct bitmap: The problem is now solved, MicroPlot now runs well on the Adafruit PyPortal and  Clue as well as the Pimoroni Pico Explorer base, but I've been tearing my hair out trying to solve a problem saving bitmaps. The bitmap problem Here's a screenshot of a display on the PyPortal together with the bitmap file which should show what's on the screen. I could not work out what's going wrong. The code creates the plot and then uses the screenshot code that Adafruit provides. import math from plotter import Plotter from plots import LinePlot import board import digitalio import busio import adafruit_sdcard import storage from adafruit_bitmapsaver import save_pixels def plot(): sines = list(math.sin(math.radians(x)) for x in range(0, 361, 4)) lineplot = LinePlot([sines],'MicroPlot line') plotter = Plotter() lineplot.p...

MicroPython development on the Raspberry Pi Pico

Get Started with MicroPython on Raspberry Pi Pico  suggests that you use the Thonny editor for development. Thonny will get you off to a quick start, but you may have an alternative editor you'd prefer to use. Lots of my friends now use VS Code; some are vim or emacs experts; many, like me, use PyCharm as their normal Python development environment. I find it more comfortable to use my normal editor for MicroPython development, but I have more compelling reasons. The first is refactoring support. I'm learning as I go, and I often want to improve the design of my code libraries as I come to understand things better. PyCharm does a very good job of refactoring Python code. There's another issue to do with version control. I'm currently sharing my Pico code on GitHub. That means I need to keep code on the Pico in sync with the code on my workstation. I haven't found an easy way to do that with Thonny, so I am using another tool to move and test code. rshell was my fi...

Controlling a Raspberry Pi Pico remotely using PySerial

Image
Update : I'm using thie code below in another project, and found that I had not correctly fixed the reported bug. The new version passes automated tests, and I am pretty sure it works OK. I have changed the name of the class to Talker  since it can both send and receive information. Apologies to all concerned for the bug! Introduction You can use a Raspberry Pi Pico as a powerful peripheral to a host - a Raspberry Pi, a Jetson Nano, a laptop or workstation. In this article you'll see how to interact with a Pico running MicroPython or CircuitPython by writing some Python code that runs on the host. The software is easy to use. It enables you to send a Python statement to the Pico and read the results. The statement can be any valid MicroPython code. Setting up the host and the Pico For this article I've used a Raspberry Pi as the host, but any computer running Windows, Linux or Mac OS will do so long as it has Python 3.5 or later installed. In particular, you can use this t...

Which Python should you install on your Raspberry Pi Pico?

Image
 The new Raspberry Pi Pico sold out soon after launch. One of the reasons it's so popular is that you can program it in Python. There are two versions of Python to consider: MicroPython and CircuitPython. Fortunately they are very easy to install or replace and they are very similar. Let's compare them so you can decide which to use. The Official guide to the Pico  (reviewed here )recommends that you install the official version of MicroPython. MicroPython has been around since 2014 , and it's been ported to quite a few boards. It was  created by Damien George, and he is responsible for the port to the Pico. If you're starting with MicroPython and  want to work your way through the Official Guide, use the official version. If you've been using MicroPython for a while you've probably heard of CircuitPython . It's based on MicroPython but  adapted by the inventive folk at Adafruit.  CircuitPython lets you run the same program on any supported board without ...

Getting started with the Raspberry Pi pico

Image
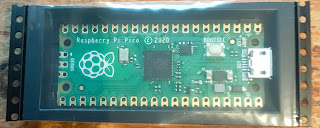
I'm always excited when Eben Upton pulls another Raspberry Pi rabbit out of his capacious topper. Last week he announced the $4  Raspberry Pi pico . It's a unique product for several reasons, and I put an order in as soon as I saw the announcement. It's easy to get the pico going The pico's on-line documentation is superb and it's supplemented by an excellent and inexpensive book from Gareth Halfacree and Ben Everard. I did hit one minor 'gotcha'. I've been working on my main workstation which runs Linux Mint, and discovered the hard way that the Thonny Editor won't install properly if you're using Python 3.5 Python 3.5 has reached end-of-life, but it's still the default on Linux Mint 18.3. If I want to use a later version I have to set up a virtual environment. Once I did that, Thonny installed perfectly and within a couple of minutes I'd created a Hello World script and run it on the pico. If you're using a Raspberry Pi to program ...

Fault-finding breadboarded circuits - a tale from the trenches

Image
blobstar Yesterday I destroyed an Atmel ATMega328 chip. (That's the chip at the heart of the Arduino.) The Atmel chips are very well designed, and it's really hard to damage them, but I've managed it twice in the last decade. Yesterday's episode was due to a mistake in wiring up an Arduino clone that I've been building on a breadboard. The clone is a descendant of Cefn Hoyle's excellent Shrimp design. I decided to build an alternative version which could be programmed using an FTDI cable and made permanent using an Adafruit perma-proto board. The correct layout (shown above) is easy to follow, but my ageing eyes led me to connect two of the power wires to the wrong pins. When I powered up the board using an FTDI cable the LED didn't blink and I knew something was wrong. But what? A simple approach to problem-solving When something stops working, you focus on what's changed. When ...

An Adafruit proto Bonnet for the Raspberry Pi, Jetson Nano and Grove I2C

Image
babelboard bonnet Adafruit's protoBoards lets you make a bread-boarded design permanent, and Seeed Studio's Grove system lets you wire up a prototype really quickly. In this half-day project I combined the two to create a simple, cheap, flexible prototyping system for the Raspberry Pi and Jetson Nano The Grove system is based on standard 4-way connectors which can be used to connect digital, analogue and I2C-based components. I've focused on I2C since most of the robots I build use I2C to interact with their environment. I mentioned the Jetson Nano - a hot topic at the moment, as NVIDIA have just announced a low-cost 2 GB version of the Nano which will be available at the end of the month. One of the clever features of the Nano is that it has a Pi-compatible header, so the bonnet will work on the Nano without modification. Fritzing the design I started by laying out an Adafruit bonnet design using Fritzing. The design is really simple. All it does is connect the pins of the...

The micro:bit is talking to the VL53L0X ToF sensors!

Image
This chip is no more :( This morning I got my Arduino sensor driver talking to a micro:bit using SPI. The Arduino Uno runs at 5 volts, and the micro:bit works at 3v3, so I used a level shifter to connect the two. My first attempt failed disastrously. The level shifter I used was based on the TI TXB0108. I managed to connect the 5v power and inputs to the 3v3 side, and I fear the magic smoke has left the chip. It's a shame, as the board was my first attempt at soldering SMD devices. It's been sitting unused in my bits box for a few years, though, so it's not the end of the world. Fortunately I had an Adafruit level shifter breakout based on the same IC. It's well laid out with very clear pin markings and I managed to connect it correctly. The replacement worked perfectly and the micro:bit MicroPython code was very straightforward. I've listed it below, and it's with the other code on GitHub . from microbit import * import struct from time imp...

Muliplexing I2C with the Adafruit TCA9548A multiplexer

Image
I want to attach multiple VL53L0X Time-of-flight sensors to a single I2C bus. It looks as if that should be easy, but it's not. One solution involves disabling the sensors and then enabling them one at  a time to change their address. It's workable, but fiddly. If you only have two sensors you could use different I2C buses, but I eventually want to run 8 sensors, so that won't work. The TCA9548A I2C multiplexer There is another approach that is easy to implement and works out of the box. The TCA9548A is an I2C device that acts a little like a telephone exchange. You can use it to route I2C transactions to one of eight separate I2C busses. That allows you to have eight devices with the same I2C address, one on each bus. I did a first experiment using an Adafruit CircuitPython m4 feather. That worked well, and I've just confirmed that it works just as well with a Raspberry Pi. Since I'm using Adafruit's CircuitPython libraries, the same code run...

Driving Anastasia's Kitronik motor controller via radio

Image
Anastasia with the controller This is the fourth in a series of articles about Anastasia - a home-brew robot based on the micro:bit. In my previous post I shared the micropython code that runs on Anastasia's remote micro:bit controller. The controller can send one of five commands to Anastasia : stop applies a brake to the motors. left spins the robot anti-clockwise. right spins the robot clockwise. forward ( you guessed it1) drives the robot forwards. backward also does what you'd expect. In this post I'll step through the code than implements these commands on Anastasia. The code looks for incoming radio messages. It translates those messages into methods on a Driver class. These methods then send control signals to the  Kitronik motor controller. Here's Anastasia's code The code starts with the necessary imports, and then begins the definition of the Driver class. from microbit import * import radio class Driver: "...

How to program a simple homebrew micro:bit-based Robot

Image
This afternoon I assembled a simple micro:bit mobile robot. It uses the Kitronik motor driver board and some Adafruit motors. I like the Kitronik board. It's easy to use, well documented, and the build quality is good. I'll be making some minor mods over the next couple of days. It needs a ToF Lidar sensor to make sure it doesn't bump into things and I plan to power it from a phone charger battery with an additional on-off switch. I'll use a second micro:bit to control it via radio. Update! There are now four articles in this series, and the robot has been named. It's called Anastasia. Here are the articles: 1. This introduction. 2. An short update when I released the initial code on GitHub . 3. A detailed walk-though of the controller code. 4. A detailed walk-through of the code that runs on the robot . Simple control code The test code I wrote to check the wiring was very simple. from microbit import * left = (pin16, pin0) right = (pi...

I2C and SPI on the micro:bit; additions to the babelboard range

Image
micro:bit Keypad using I2C+ MC23008 For some reason there's not a lot on the web about using I2C and SPI with the BBC micro:bit. The I2C and SPI protocols allow single board computers like the micro:bit, the Raspberry Pi and Jetson Nano to drive hundreds of different types of useful peripheral chips. There are lots of widely available drivers for the Raspberry Pi, the Arduino and  Adafruit boards. I've seen fewer for the micro:bit, and I have started writing some more as part of my babelboard project . I am also building a babelboard for the micro:bit. The babelboard project Babelboards allow you to connect a range of I2C and SPI devices to several popular single board computers. The image on the right shows an mcp23S08 reading a hex keypad driven by a micro:bit using SPI. The micro:bit babelboard allows you to connect Grove I2C devices and the Quick2Wire port expander and analog boards. You can get adapters that connect Grove to Qwiik , so you can also con...

Adafruit Clue - love at first sight

Image
My Adafruit Clue has just arrived, and I am delighted with it. The Clue is a small single board computer that has the same format and connectors as the BBC micro:bit . It's more expensive than the micro:bit but it's a much, much more capable device. micro:bit Pros and Cons  I still love the micro:bit. It invites you to interact with it as soon as you power it on and it's introduced a huge audience to the pleasures of programming. There are a range of programming options for the micro:bit, including micropython, and it's easy to program using the free mu editor.  However, it has some frustrating limitations. The micro:bit's 5x5 LED display is cute, but scarcely high-resolution. There are a few on-board sensors - an accelerometer and a magnetometer - and you can coax the processor chip into telling you how hot it is. It has a couple of buttons, and it supports radio communication with other micro:bits. But that's all. It also has quite limi...

An excellent course for Jetson Nano owners

Image
Jetson Nano Regular readers will know than I'm a keen Jetson Nano owner. Recently I posted a series about how to started with the computer but NVIDIA have now published an excellent course,  ' Getting Started with the Jetson Nano ', which is  free for members of the NVIDIA developers' program. The course comes with a pre-built image which can run the Nano in headless mode. That's very useful - I had to buy a new monitor to get going, as none of my old monitors had native HDMI support. The image provide with the course just needs a Nano and a Laptop or Desktop computer with a USB port. The course is a great introduction to deep learning with a GPU. Once you've completed it you may want to delve deeper; there are lots of excellent Deep Learning courses available on-line, and many of them use Google's Colab for practical sessions. Google Colab gives you free access to top-of-the range NVIDIA hardware, and if you want to run your trained models l...

Getting Started with the Jetson Nano

Image
Note: The approach outlined in this series will still work, but there is an interesting official alternative. The Jetson team at NVIDIA have created an excellent self-study course , supported by a downloadable image which is similar to the one used in these articles. To use the NVIDIA image, you'll need: Jetson Nano Developer Kit Computer with Internet Access and SD card port microSD Memory Card (32GB UHS-I minimum) USB cable (Micro-B to Type-A) If you just want to use the course image, you can get by with those items and a 5V 2.5A power supply but to take the course you will need compatible 5V 4A Power Supply with 2.1mm DC barrel connector 2-pin jumper compatible camera such as Logitech C270 Webcam or Raspberry Pi Camera Module v2 You will not need a monitor, mouse or keyboard . To learn where to find the DLI course image, and how to get started with it, you should enroll on the course . It's free, takes about 8 hours, and will give you an excellent ...

Wearable electronics with Gemma and Flora

Image
From Wembley to Southend Adafruit Gemma This evening I'm off to Createspace in Wembley to work on some wearable electronics. I'm helping with a wearable electronics workshop at this weekend's Southend Raspberry Jam , and I need to practice! I've been to several Raspberry Jams at Southend, and thoroughly enjoyed them. There's always a strong local presence as well as a group of regular visitors from further away. Great talks and workshops - whether you're an beginner at making things or an old hand, you'll find interesting and helpful people. Createspace Createspace is my nearest maker space. I've been to the London Hackspace, which is awesome, but it takes me a while to get there from home. Createspace has an impressive collection of facilities and is much easier for me to get to. They have open nights, and there's a regular meetup for electronic hackers. Gemma and Flora Tonight I'll be experimenting with Adafruit's Gemma and F...