Posts

Showing posts with the label Python

Can ChatGPT code like a pro?

I've been experimenting with the code generation capabilities of ChatGPT, and I'm blown away. As a test of its capabilities I decided to ask it to write a generic version of some code I've used, over and over, in slightly different forms, in real applications. The Problem The code implements a Throttler - a class that wraps something that makes requests and makes sure that requests are not made too often. Lots of APIs apply rate limits to requests, and this code makes it easy to enforce those limits within your application. A coding session with ChatGPT Here'es the session I had with ChatGPT. My instructions are in italics . Everything else - code, comments, and explanations - was written by ChatGPT in response. Write Python to create an Abstract Class called Requester. It should have a single abstract method called request that takes an argument called command. Add docstring comments. Here is the Python code to create an Abstract Class called Requester with a single ...

How to write reliable tests for Python MQTT applications

More and more IoT applications use MQTT. It's a simple and very useful messaging framework which runs on small boards like the Raspberry Pi Pico as well as systems running under Linux, MacOS and Windows. I recently decided to add some extra functionality to Lazydoro using MQTT. The code seemed to work when run manually but I had a lot of trouble getting my automated tests working. It took quite a while to understand the problem, but the fix was simple. Intermittently failing tests are bad In the end-to-end test that was causing the problem, the code simulated the start of a pomodoro session and then checked that the correct MQTT message had been  sent. The test usually failed but sometimes passed. When I manually ran a separate client that subscribed to the message stream I could see that the right messages were being sent. Intermittently failing (or passing) tests are a nuisance. They do nothing to build confidence that the application under test is working reliably, and they are ...

Lazydoro Mk 3 - lots of automated tests for a simple design

Image
At the end of  yesterday's post lazydoro was running on a Pi zero still not working reliably. In November 2021 I worked on Ness Labs ' Write a book in 30 days challenge. I had to rely on a web-based Pomorodo timer, and thought I'd have another try at the lazydoro project. I decided to rewrite lazydoro from scratch. Lazydoro needs to do four things. It needs to know when I arrive at or leave my desk It needs to keep track of passing time It needs to know where I am in a Pomodoro cycle It needs to provide feedback to keep me on track. To make lazydoro easy to test I used a variant of the Ports and Adapters architecture. (Ports and Adapters is sometimes called Hexagonal Architecture). I first came across it in an article by Alistair Cockburn , and it made a lot of sense. It's also featured in the GOOS book: Growing Object Oriented Software Guided by Tests . Simple architecture Here's the architecture for lazydoro: At the centre is the applicat...

APL and Python go head-to-head

Markdown is great, but... I've encountered a problem. I use Markdown a lot. Since it's pure text-based markup, it's handled well by Git and GitHub. That helps me keep track of versions, and it simplifies text merges if I'm collaborating on a writing project. A lot of my writing features Python code, and I like to work on the code and the article in the same editor. Fortunately there's great support for editing and displaying Markdown in both PyCharm and VS Code . Markdown is supported by lots of FOSS tools which make it easy to convert between Markdown and other formats. I regularly use pandoc to turn Markdown in to pdfs and to publish on Leanpub , and I use the markdown package to convert Markdown files into HTML which I can paste into Blogger. (Pandoc can create HTML but the output is not directly usable in Blogger.) So I have a problem. Much of markdown is standardised but the pandoc and markdown programs handle code blocks differently. ...

Let the computer test your Python GUI application

Image
Let the computer test your Python GUI application In this article you’ll see how easy it is to write automated tests for Graphical User Interfaces (GUIs) written using the brilliant guizero Python library. I’ll start with a horror story which explains why I’m so keen on automated GUI tests. Next I’ll describe an application that I’m using as an example. The code for the app and the test are available on GitHub; the link is in the resources section at the end of this post. After that, I’ll show how the tests are built up and describe how they enabled me to find and fix a bug. A personal horror story A couple of years ago I presented a Quiz Runner application to an audience of Digital Makers. The Quiz Runner application used a workstation to manage the Quiz. Quiz Contestants used micro:bits to ‘buzz’ in when they thought they knew an answer. The micro:bits communicated via radio using the micro:bit’s built-in radio capability, and everything (workstation and micro:bits) was pro...

Pi Pico emulating an Etch-a-sketch

Image
  One Christmas, long, long ago, someone gave me an Etch-a-sketch . I was a bit of a klutz then (indeed, I still am). I never produced great works of art, but the Etch-a-sketch was a lot of fun to play with. Yesterday I wondered how easy it would be to emulate an Etch-a-sketch using the Raspberry Pi Pico. Using PySerial to link Pi and Pico I’d just finished yesterday’s article about how to link a host to the Pico using PySerial. Why not get the Pico to print out how far two potentiometer knobs were turned,  read the output on the Pi using PySerial,  and use the Turtle package on the Pi to create the display? It sounded too simple to work, so I started coding with some trepidation. The first job was to connect a couple of potentiometers to the analogue inputs of the Pico. After that I wrote a short MicroPython program which read the analogue values and printed them out. Here it is: import machine import utime pot_l = machine.ADC( 27 ) pot_r = machine.A...

Controlling a Raspberry Pi Pico remotely using PySerial

Image
Update : I'm using thie code below in another project, and found that I had not correctly fixed the reported bug. The new version passes automated tests, and I am pretty sure it works OK. I have changed the name of the class to Talker  since it can both send and receive information. Apologies to all concerned for the bug! Introduction You can use a Raspberry Pi Pico as a powerful peripheral to a host - a Raspberry Pi, a Jetson Nano, a laptop or workstation. In this article you'll see how to interact with a Pico running MicroPython or CircuitPython by writing some Python code that runs on the host. The software is easy to use. It enables you to send a Python statement to the Pico and read the results. The statement can be any valid MicroPython code. Setting up the host and the Pico For this article I've used a Raspberry Pi as the host, but any computer running Windows, Linux or Mac OS will do so long as it has Python 3.5 or later installed. In particular, you can use this t...

An Adafruit proto Bonnet for the Raspberry Pi, Jetson Nano and Grove I2C

Image
babelboard bonnet Adafruit's protoBoards lets you make a bread-boarded design permanent, and Seeed Studio's Grove system lets you wire up a prototype really quickly. In this half-day project I combined the two to create a simple, cheap, flexible prototyping system for the Raspberry Pi and Jetson Nano The Grove system is based on standard 4-way connectors which can be used to connect digital, analogue and I2C-based components. I've focused on I2C since most of the robots I build use I2C to interact with their environment. I mentioned the Jetson Nano - a hot topic at the moment, as NVIDIA have just announced a low-cost 2 GB version of the Nano which will be available at the end of the month. One of the clever features of the Nano is that it has a Pi-compatible header, so the bonnet will work on the Nano without modification. Fritzing the design I started by laying out an Adafruit bonnet design using Fritzing. The design is really simple. All it does is connect the pins of the...

Mu, Edublocks and the Kitronik Inventor's kit

Image
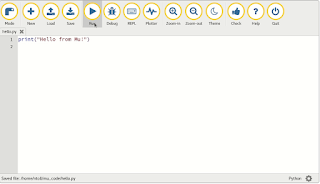
A friend of mine recently asked me about Python programming on the micro:bit. I told him that I wrote a free workbook about that a while back. (If you'd like to get a copy you can sign up here ).   It's based around the excellent mu editor . Code with Mu Mu is a no-frills editor that you can use to develop and run programs on the micro:bit , Adafruit CircuitPython boards , the Raspberry Pi and other Python environments Mu has just enough features to be usable without being daunting. I love it. But some young students find text-based programming a bit scary. How can they get started? Code with Edublocks Some younger programmers are happier with block-based (visual) programming. For them, Edublocks is a great solution. Edublocks is block based, runs in your browser, and looks like the popular Scratch environment, but it's Python-oriented . Here's the Edublocks version of the code for the first experiment for Kitronik's excellent micro:bit Inventor's Kit ....

Explorer HAT book - two more draft chapters

    I've drafted a couple more chapters for Explorer HAT tricks . They need editing but I will publish a new version of the book with the new chapters next week. If you've bought it you will get the updates free of course. The video shows one of the projects - a simulation of a Pelican Crossing. You can find out more about the book here .

Using pyserial on a Raspberry Pi to read Arduino output - WebDVM part 2

Image
This series describes how to build a simple web-based DVM (digital volt meter) that can display up to six voltages in a web browser. It's a really useful hack if you need to measure several voltages at once. In part 1 you saw how to send analog voltage data over a serial link to a Raspberry Pi. For testing purposes you displayed the data in a terminal window on the Pi. In this part you will use read that data using Python on the Pi and print the data to standard output. In the next part you'll turn your Python script into a dynamic application that displays the 6 voltages in a browser, updating the web page as the values change. The code ( available on github ) uses the pyserial package. It's a simple approach, but there are a few issues to find your way around. You'll see the problems and solutions below. Pyserial pyserial is a Python package that allows Python programs to read and write data using serial ports. You can install it via pip. pip3 ins...

Build a Web-based DVM using Arduino and Pi zero W

Image
This three-part series show you how to build build a Web-based 6-channel DVM (digital voltmeter)  using an Arduino and Raspberry Pi zero. If you’re experienced and impatient you will find software and basic installation instructions on GitHub. If you’re less experienced, don’t worry. All you need to know is: how to compile and download an Arduino sketch, how to connect your Raspberry Pi to your network, and how to open a terminal session on the Pi. The project is fun, useful, and simple. You probably have the parts already, in which case the whole project will take about an hour to program and connect. You don’t need to solder anything. The WebDVM uses some general techniques that you can apply to projects of your own In Part 1 (this post)  you will install some simple Arduino code, connect the Arduino to a Pi, and check that the two are communicating. In Part 2 you’ll use a short Python program on the Pi to read the Arduino’s output. In Part 3 you'll use a...

AL/DL explorers - two great, free resources for you

Image
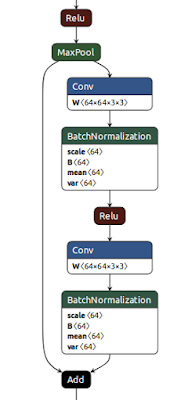
I'd like to share two really useful free resources for anyone exploring Artificial Intelligence and Deep Learning. Netron The first is netron - an Open Source tool for displaying Deep Learning models. The image on the right is a small part of netron's display of  resnet-18. Netron covers a wide range of saved model formats is really easy to install is MIT licensed  is implemented in JavaScript and  can be installed and invoked from Python. Computer Vision Resources The second find is Joshua Li's 'Jumble of Computer Vision' - a curated list of papers and blog posts about Computer Vision topics. It's going to keep me reading for weeks to come :) Many thanks to Joshua for making this available.

Pimoroni Explorer Pro Hat - first impressions

Image
This morning my new Explorer Hat from Pimoroni arrived, and the tempation to play has proved to much to resist. There are two versions of the Explorer Hat, standard and Pro. I greedily ordered one of each; the standard version is great for experimenting, but the Pro version offers several extra useful features. I started with the Pro. I love it. Here's what the Explorer hats provide: Four buffered 5V tolerant inputs Four powered 5V outputs (up to 500mA!) Four capacitive touch pads Four capacitive crocodile clip pads Four coloured LEDs PRO ONLY  Four analog inputs PRO ONLY  Two H-bridge motor drivers PRO ONLY  A heap of useful (unprotected) 3v3 goodies from the GPIO A mini breadboard on top! It took me a couple of minutes to get the environment set up The Readme on the github site tells you how prepare your Pi, and then walks you though some fun experiments. One thing to watch: the setup instructions suggest that you install pip by typin...

Tweeting Morse Code with Raspberry Pi and Arduino

Image
I'm stuck at home and have seized the opportunity to prepare for a workshop that will link the Shrimp and the Raspberry Pi. I love reusing previous projects. This one combines two bits of software that I prepared earlier :) Twitter client meets Morse Code flasher The core idea is simple. The project listens to what's happening on Twitter, and displays selected tweets by flashing the contents in Morse Code. You could do this using the Pi on its own, or the Arduino on its own, but the project is easier and more reliable if you combine the strengths of both platforms. Why the Pi? It's possible to run a Twitter client on the Arduino but you're pushing the hardware to its limits. I've found some Arduino Internet libraries to be unstable, and your application is likely to be using most or all of the Arduino's limited program and data memory. The Pi's memory is roughly a million times larger than the Arduino's RAM, and Internet applications are ...

C3PI: the Pi and Teensy are talking

Image
The Pi and the Teensy are talking. The Teensy is running the fortune cookie sketch. I've been using pyserial on the Pi, and using interactive python. Here's a screenshot of an ssh session on the Pi: Next Step Next I'm going to solder up a mini-stripboard for the Teensy.

Raspberry Pi Model B+ version detection

Image
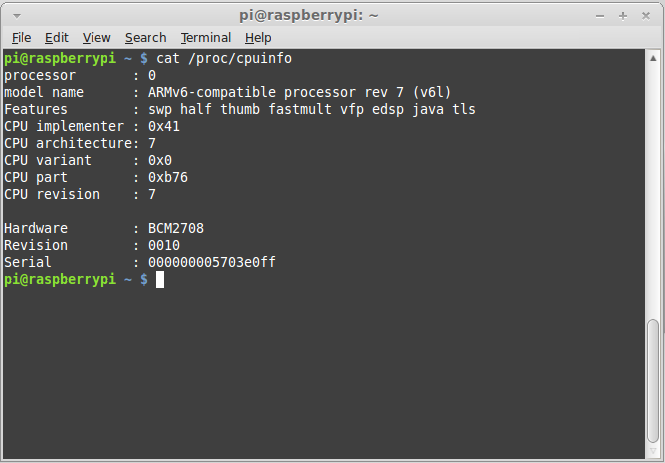
First, the good news. Existing code that relies on my revision detector script will work with Raspberry Pi Model B+. I'd forgotten how hacky my version detection code was. It assumes that if a board isn't revision 1, it must be revision 2. Here's the contents of /proc/cpuinfo for the new boards >> So the current detector thinks that boards are rev 2, and existing code will work because the layout for the first 26 pins on the Raspberry Pi header has not changed. What the current code won't do is let you know that you've got an extra 14 pins to play with. Fixing this requires two sorts of change: one to the detector (which is easy) and one to whatever code is using it. I'll take a look later in the week at what work will be needed to get the Quick2Wire GPIO code to give access to the extra pins, but before that I will check that current I2C code works OK. That too will need a (trivial) change to work correctly with a version of the detector th...

Raspberry Pi Model B+ first impressions

Image
and a worry! Farnell element14 have just delivered my new Raspberry Pi Model B+, along with some 40-way connectors. The Pi is destined for C3Pi , my Pi+ Arduino tracked robot. The main benefits of the Raspberry Pi B+ for C3Pi are the extra USB sockets and the reduced power consumption. I can see all sorts of possibilities created by the 40-way extended GPIO header, but I don't expect to take advantage of those in C3Pi. Unboxing the Raspberry Pi model B+ Raspberry Pi Model B+ Here is the Pi model B+. It's familiar, yet subtly different from its predecessors. It has a neater look about it and the 2x20 rows of GPIO pins are clearly ready for some serious work. I have one big question, which I hope to answer shortly: what is the hardware revision of the new board? Will some Python libraries crash on the Model B+? The board revision matters more than you might think. Back in the days when I was running Quick2Wire I came up with a little Python script you cou...

Practical Robotics - Python, Arduino, OpenCV and Squirrels

Image
Who says that  this stuff has no practical use? Here's how to deal with those pesky squirrels.