Posts

Showing posts from 2019

Pimoroni Explorer Hat Tricks
Image
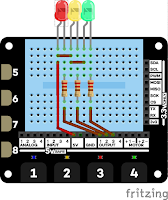
Yesterday I talked about my plans for the Pimoroni Explorer HAT. I've started the GitHub repository for the code from Explorer Hat Tricks. That's the ebook I'm writing for users of the Explorer HAT, HAT Pro and pHAT. At present there are just a few examples and a single project, but I only started yesterday :) I'll post here and tweet ( @rareblog ) as more code becomes available. Leanpub  I'm developing the ebook on Leanpub , a publishing platform. Leanpub is good for authors and great for readers. Readers like it because they get a chance to see a sample free lifetime updates for every book in their library, paid-for or free a 45-day money-back guarantee, and DRM-free content in pdf, mobi and epub formats.   Try the code out You'll need a Raspberry Pi with 40-pin header (zero, 2, 3 or 4) running Raspbian Buster a Pimoroni Explorer HAT Pro . Most of the code will also work on the original HAT or pHAT, but some will need the Pro f

Raspberry Pi fun with the Pimoroni Explorer Hat

Image
Pimoroni Explorer Hat Pro I love the pirate crew at Pimoroni more than ever! Last week Pimoroni ran a series of competitions on twitter. The prizes were gift tokens and I was lucky enough to win one. My Pirate booty included an Explorer Hat Pro and a parts kit . I've been playing with them ever since. The Hat lets you protoype Raspberry Pi projects in minutes. You don't need to do any soldering and the Python library is quick to install, well written and commented and really easy to use. One good turn deserves another I suspect that beginners would welcome more  'how-to' guides, and I'm putting some together. I plan to publish open source code on GitHub, and to publish detailed instructions in a low-cost e-book. If you've got suggestions or ideas for content that you'd be happy for me to use,  let me know in a comment, or tweet your ideas to @rareblog on Twitter.

Docker build for TensorFlow 1.14 + Jupyter for Rasapbian Buster on Raspberry Pi 4B

Image
I've updated an old Docker build to create a Docker image for Raspberry Pi  Buster. It contains Katsuya Hyodo's TensorFlow wheel which has TensorFlow Lite enabled. The image contains Jupyter, so you can connect to the running image from anywhere on your network and run TensorFlow notebooks on the Pi. This is highly experimental - don't use it for anything important :) Once I've done some tidying up (and a lot more testing!) I'll put the image up pon DockerHub. To build/run it you need the Docker nightly build. I installed it by invoking curl -fsSL get.docker.com | CHANNEL=nightly sh If you find any problems please raise an issue on GitHub.  

Benchmarking process for TF-TRT, and a workaround for the Coral USB Accelerator

Image
A couple of days ago I published some benchmarking results running a TF-TRT model on the Pi and Jetson Nano. I said I'd write up the benchmarking process. You'll find the details below. The code I used is on GitHub . I've also managed to get a Coral USB Accelerator running with a Raspberry Pi 4. I encountered a minor problem, and I have explained my simple but very hacky workaround at the end of the post. TensorFlow and TF-TRT benchmarks Setup The process  was based on this excellent article , written by Chengwei Zhang . On my workstation I started by following Chengwei Zhang's recipe. I trained the model on my workstation using and then copied trt_graph.pb from my workstation to the Pi 4. On the Raspberry Pi 4 I used a virtual environment created with pipenv , and installed jupyter and pillow . I downloaded and installed this unofficial wheel . I tried to run step2.ipynb but encountered an import error. This turned out to be an old TensorFl

Benchmarking TF-TRT on the Raspberry Pi and Jetson Nano

Image
Trying to choose between the Pi 4B and the Jetson Nano for a Deep Learning project? I recently posted some results from benchmarks I ran training and running TensorFlow networks on the Raspberry Pi 4 and Jetson Nano. They generated a lot of interest, but some readers questioned their relevance. They were'n interested in training networks on edge devices. Most people expect to train on higher-power hardware and then deploy the trained networks on  the Pi and Nano. If they use TensorFlow for training, they have are several choices for deployment: Standard TensorFlow TensorFlow Lite TF-TRT (a TensorFlow wrapper around NVIDIA's TensorRT, or TRT) Raw TensorRT In this post I'll focus on timing Standard TensorFlow and TF-TRT. In a later post I plan to cover TensorFlow Lite on the Pi with and without accelerators like the Coral EDGE TPU coprocessor and the Intel Compute Stick. I've run a number of benchmarks, and the results have been much as I expected. I d

Training ANNs on the Raspberry Pi 4 and Jetson Nano

Image
There have been several benchmarks published comparing performance of the Raspberry Pi and Jetson Nano. They suggest there is little to chose between them when running Deep Learning tasks. I'm sure the results have been accurately reported, but I found them surprising. Don't get me wrong. I love the Pi 4, and am very happy with the two I've been using. The Pi 4 is significantly faster than its predecessors, but... The Jetson Nano has a powerful GPU that's optimised for many of the operations used by Artificial Neural Networks (ANNs). I'd expect the Nano to significantly outperform the Pi running ANNs. How can this be? I think I've identified reasons for the surprising results. At least one benchmark appears to have tested the Nano in 5W power mode. I'm not 100% certain, as the author has not responded to several enquiries, but the article talks about the difficulty in finding a 4A USB supply. That suggests that the author is not entirely

Sambot - MeArm, servos, the Babelboard and Jetson Nano

Image
Jud McCranie CC BY 3.0 via Wikimedia Commons Way back in 1974 I took Tom Westerdale's Adaptive Systems course as part of my Masters degree. Tom's thesis advisor was John Holland, and a lot of the course covered genetic algorithms. Before that it covered early machine learning applications like Samuel's Checkers Player . I've wanted to revisit those early AI applications for a while, and I recently decided to put a new spin on an old idea. I want to build a robot that plays Checkers (that's draughts to us Brits) using a real board, a robot arm and a Jetson Nano using a Raspberry Pi camera. The game play could be done using a variant of Samuel's approach, a Neural network, or a combination of the two. If AlphaGo can master Go playing against itself it shouldn't be too hard for a pair of Machine Learning programs to maser draughts! First, though, I need to build a controllable arm that can pick up and move the pieces and a computer vision system t

An excellent course for Jetson Nano owners

Image
Jetson Nano Regular readers will know than I'm a keen Jetson Nano owner. Recently I posted a series about how to started with the computer but NVIDIA have now published an excellent course,  ' Getting Started with the Jetson Nano ', which is  free for members of the NVIDIA developers' program. The course comes with a pre-built image which can run the Nano in headless mode. That's very useful - I had to buy a new monitor to get going, as none of my old monitors had native HDMI support. The image provide with the course just needs a Nano and a Laptop or Desktop computer with a USB port. The course is a great introduction to deep learning with a GPU. Once you've completed it you may want to delve deeper; there are lots of excellent Deep Learning courses available on-line, and many of them use Google's Colab for practical sessions. Google Colab gives you free access to top-of-the range NVIDIA hardware, and if you want to run your trained models l

Use websockets to build a browser-based Digital Voltmeter

Image
This is the third and final part of a series about building a browser-based six-channel Digital Voltmeter (DVM) using an Arduino and a Raspberry Pi. Part one covered the software on the Arduino and the USB connection to the Raspberry Pi. Part two showed you how to use the pyserial package to read that data into a Python program and print the results as they arrived. In this final part you'll see how to use Joe Walnes ' brilliantly simple websocketd . You'll see how you can turn the Python program into a server without writing any additional code! Finally, you'll view a web-page that displays the voltages in more or less real-time. Web sockets with websocketd HTTP makes it easy for a web browser to ask for data from a web server. That approach is known as client pull because the client (the web browser) pulls (requests) the data from the server. For the DVM application you want to use server push; in other words, you want to send changes in the voltages

Using pyserial on a Raspberry Pi to read Arduino output - WebDVM part 2

Image
This series describes how to build a simple web-based DVM (digital volt meter) that can display up to six voltages in a web browser. It's a really useful hack if you need to measure several voltages at once. In part 1 you saw how to send analog voltage data over a serial link to a Raspberry Pi. For testing purposes you displayed the data in a terminal window on the Pi. In this part you will use read that data using Python on the Pi and print the data to standard output. In the next part you'll turn your Python script into a dynamic application that displays the 6 voltages in a browser, updating the web page as the values change. The code ( available on github ) uses the pyserial package. It's a simple approach, but there are a few issues to find your way around. You'll see the problems and solutions below. Pyserial pyserial is a Python package that allows Python programs to read and write data using serial ports. You can install it via pip. pip3 ins

Build a Web-based DVM using Arduino and Pi zero W

Image
This three-part series show you how to build build a Web-based 6-channel DVM (digital voltmeter)  using an Arduino and Raspberry Pi zero. If you’re experienced and impatient you will find software and basic installation instructions on GitHub. If you’re less experienced, don’t worry. All you need to know is: how to compile and download an Arduino sketch, how to connect your Raspberry Pi to your network, and how to open a terminal session on the Pi. The project is fun, useful, and simple. You probably have the parts already, in which case the whole project will take about an hour to program and connect. You don’t need to solder anything. The WebDVM uses some general techniques that you can apply to projects of your own In Part 1 (this post)  you will install some simple Arduino code, connect the Arduino to a Pi, and check that the two are communicating. In Part 2 you’ll use a short Python program on the Pi to read the Arduino’s output. In Part 3 you'll use a simp

apl-reggie: Regular Expressions made easier in APL

What's APL? Like GNU, APL is a recursive acronym; it's A Programming Language. I first met APL at the IBM education centre in Sudbury Towers in London. I was a student reading Maths at Cambridge University, and IBM asked me to do a summer research project into a new technology called Computer Assisted Instruction. (I wonder what happened to that crazy idea?) APL was one of the first languages to offer a REPL (Read Evaluate Print Loop), so it looked like good technology for exploratory programming. APL was created by a mathematician. Its notation and syntax rationalise mathematical notation, and it was designed to describe array (tensor) operations naturally and consistently. For a while in the '70s and '80s APL ruled the corporate IT world. These days it's used to solve problems that involve complex calculations on large arrays. It's not yet used as widely as it should be by AI researchers or Data Scientists, but I think it will be, for reasons that

Another free tool for Jetson Nano users

Image
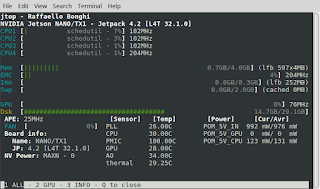
jtop outout Raffaello Bonghi, one of the members of the unofficial Jetson Nano group on FaceBook has published jetson-stats , a toolkit for Jetson users. jetson-stats works on all the members of the Jetson family. My favourite program in jetson-stats is jtop. It's a greatly enhanced version of the linux top command. jtop shows a very useful real-time view of CPU and GPU load, memory use and chip temperature. Find jetson-stats on GitHub , or install it via pip/pip3.

AL/DL explorers - two great, free resources for you

Image
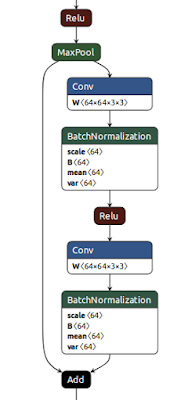
I'd like to share two really useful free resources for anyone exploring Artificial Intelligence and Deep Learning. Netron The first is netron - an Open Source tool for displaying Deep Learning models. The image on the right is a small part of netron's display of  resnet-18. Netron covers a wide range of saved model formats is really easy to install is MIT licensed  is implemented in JavaScript and  can be installed and invoked from Python. Computer Vision Resources The second find is Joshua Li's 'Jumble of Computer Vision' - a curated list of papers and blog posts about Computer Vision topics. It's going to keep me reading for weeks to come :) Many thanks to Joshua for making this available.

Five steps to connect Jetson Nano and Arduino

Image
Yesterday's post showed how to link a micro:bit to the Jetson Nano. One of the members of the (unofficial) NVIDIA Jetson Nano group on Facebook asked about connecting an Arduino to the Jetson. Here's a simple recipe for getting data from the Arduino to the Jetson Nano. It should work on all the Jetson models, not just the Nano, but I only have Nanos to hand. On request, I've added a recipe at the end of this post which sends data from the Jetson Nano to the Arduino; it turns the default LED on the Arduino on or off. The recipe for sending data from the Arduino to the Jetson has just 5 stages: Program the Arduino. (I used the ASCIITable example). Connect the Arduino to the Jetson using a USB connector Install pyserial on the Jetson Download a three-line Python script Run the script.   Programming the Arduino I used an Arduino Uno, and checked it on a verteran Duemilanove (above), but any Arduino should work. You'll need to do this step usi

Connect the Jetson Nano to the BBC micro:bit in 5 minutes or less

Image
There's huge interest in using the Jetson Nano for Edge AI - the place where Physical Computing meets Artificial Intelligence. As the last few posts have shown , you can easily train and run Deep Learning models on the Nano. You'll see today that it's just as easy to connect the Nano to the outside world. In this simple proof-of-concept you'll see how to connect the Nano to a BBC micro:bit and have the Nano respond to an external signal (a press on the micro:bit's button A). You'll need a Jetson Nano a computer with the Mu editor installed a BBC micro:bit a USB lead to connect the Jetson to the micro:bit Here's a video that takes you through the whole process in less than 5 minutes. I'll be posting more complex examples over the next few days. To make sure you don't miss them, follow @rareblog on twitter.

Getting Started with the Jetson Nano - part 4

Image
I'm amazed at how much the Nano can do on its own, but there are times when it needs some help. A frustrating problem... Some deep learning models are too large to train on the Nano. Others need so much data that training times on the Nano would be prohibitive. Today's post shows you one simple solution. ... and a simple solution In the previous tutorial , you went through five main steps to deploy the TensorFlow model: Get training data Define the model Train the model Test the model Use the model to classify unseen data Here's the key idea: you don't have to do all those steps on the same computer . Saving and Loading Keras Models   The Keras interface to TensorFlow makes it very easy to export a trained model to a file . That file contains information about the way the model is structured, and it also contains the weights which were set as the model learned from the training data. That's all you need to recreate a usable copy of th