Pages

Tuesday, 29 July 2014

Shrimping It! and Arduino workshops

Workshops in London on September 13th

I'm running two linked half-day workshops on 23th September in central London.
The Shrimp

The morning workshop is called Making the Shrimp! It's an extended version of the very successful session I ran at BCS SPA on 30th June.

In it you'll learn how to make, test and program the Shrimp - a low-cost Arduino clone on a breadboard. You get to keep the hardware!

The afternoon workshop is called Life After Blink. It consists of five experiments using an Arduino or the Shrimp.

If you decide to attend just the afternoon workshop you  will need to bring your own Arduino, or buy one  when you register for delivery on the day. The price below includes the experimenter's kit but not the Arduino.

You'll need to bring your own laptop for both workshop - make sure it has an available USB port!

Early bird prices are available until 16 August. If you book before that date you'll pay £37.50 for a half day or £75 for a full day. Full day participants get a complimentary sandwich lunch.

After then the prices will rise to £42.70 for a half day or £85 for a full day.

Booking is open now - click here today to make sure of your place.


Wednesday, 16 July 2014

IoT Security (or lack of it) - why you should worry

The Internet of Things (IoT) is cool, and business has realised it's going to be big. But is it going to be secure enough?

I'm normally a pretty laissez-faire sort of chap, but I am very concerned about the current attitude towards security on the Internet of Things.

I posted recently on The Analogies project, and I'll be talking about this at an IoT meeting later this year. But this is a problem right now.

Here's one example.

I was recently approached by someone from an open-source IoT project to see if I'd like to get involved.

I had a look on their website, and what they were doing looked great. Except...

There was no mention of security.

I asked, and got the reply that this was not a concern, as they assumed that the home network was secure.

Don't assume the home network is secure

Sadly many home networks are easily hackable. The recent excitement over OpenSSL means that most hobbyist web-servers using https have been vulnerable for ages (and they probably still are). Worse still, many routers sit at home with default security settings (including default passwords), allowing anyone with a little technical knowledge the chance to invade the home network at their leisure.

Why worry?

Does that matter? Of course it does.

If you're a burglar with access to someone's energy consumption patterns it's really easy to detect when the house is unoccupied.

And lots of other things get connected to the web. If you have outdoor webcams, do you have a kidnappable pet? The kidnappers would love to know when the pets are out and you aren't in. (Let's not even mention the risks to children).

We don't worry enough about all of this because most of us haven't heard horror stories about the IoT yet. But when we do, will it be too late?

What's your take? I'd love to read your comments.


Got a Raspberry PI B+ and need a downverter? Drop me a note.

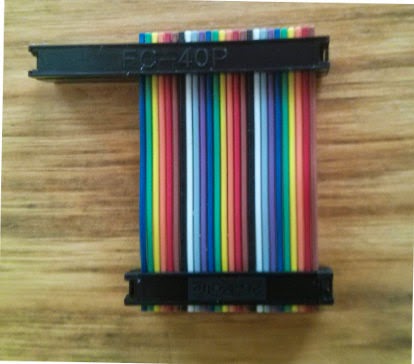
If you want to use the Adafruit cobbler or  the Quick2Wire interface board with a Raspberry Pi model B+ you'll need a downverter. (That's a 40-way to 26-way adapter).

Adafruit will be shipping their version 'soon', but if you're in the UK and can't wait, I've got enough connectors and cable to put together a few.

For the next few days I will make one up and post it to you first class within the UK for £4.50 including postage and packing. (I'm not VAT registered so there is no VAT to pay). Drop me an email at romilly.cocking@gmail.com.

Raspberry Pi Model B+ issue (and solution)

Raspberry Pi Model B+
I've hit a bit of a hardware compatibility problem with the new Raspberry Pi Model B+

When my new Raspberry Pi B+ arrived yesterday I started wondering about the software implications.

I wanted to verify that the Quick2Wire, Adafruit and Raspi.GPIO libraries work as intended on the new boards, but instead I hit a problem with the new hardware layout.

The new design has 40 GPIO pins, and the people at Pi Towers have arranged that the first 26 pins have the same function as they did before. But...

Twenty-six onto forty won't go!

I naively imagined that this would mean I could just plug in a 26-way connector onto the correct end of the 40-pin header.

It doesn't work, at least with the cables I've tried. The female sockets are so wide that they won't sit down on the 40-way header. You'd have the same problem with the cables supplied with Adafruit's cobbler, as they use standard-width IDC connectors.

And the PiFace won't fit

I thought for a moment that the PiFace might be OK. It's socket is narrower than the standard-with IDC connectors, and it would have sat down fine. Sadly, the new board layout clashes with the PiFace, and I suspect that many other boards won't work either. If I'm right there is going to be a scramble for add-on manufacturers to bring out new 'plus' versions.

It's not a (big) problem for the Quick2Wire boards, though, or for the Adafruit Cobbler.

A quick fix for Quick2Wire boards

RaspPi B+ and Q2W boards
As luck would have it I'd decided to order some 40-way connectors at the same time as I ordered the Pi. I already had a 26-way socket and some 26-way ribbon cable in stock, so I quickly built a 26-way to 40-way adapter cable.

Here's the result >>

And it works.

I can see several other possible solutions. I'll be trying a few more over the next few days, and will report here.

Update:

Also, it looks as if Adafruit are half a jump jump ahead - they have B+ versions of the cobbler, but they are currently out of stock.

What's your experience?

I'm delighted with the new board, and I will definitely be using it for C3Pi, using custom connectors.

I'm sure we'll see plenty more innovative solutions form the community.

Have you hit this problem? Found a good work-around? I'd love to hear. Please let me know in a comment.

Tuesday, 15 July 2014

Raspberry Pi Model B+ version detection

First, the good news. Existing code that relies on my revision detector script will work with Raspberry Pi Model B+.

I'd forgotten how hacky my version detection code was. It assumes that if a board isn't revision 1, it must be revision 2.

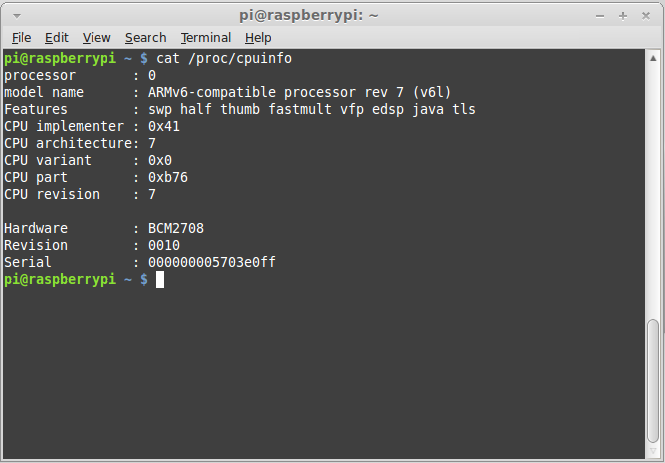
Here's the contents of /proc/cpuinfo for the new boards >>

So the current detector thinks that boards are rev 2, and existing code will work because the layout for the first 26 pins on the Raspberry Pi header has not changed.

What the current code won't do is let you know that you've got an extra 14 pins to play with.

Fixing this requires two sorts of change: one to the detector (which is easy) and one to whatever code is using it.

I'll take a look later in the week at what work will be needed to get the Quick2Wire GPIO code to give access to the extra pins, but before that I will check that current I2C code works OK. That too will need a (trivial) change to work correctly with a version of the detector that distinguishes between rev 1, rev 2 and B+ configurations.

Again, if you're interested, follow @rareblog on twitter or +RAREBlog on G+ to see the results.

Raspberry Pi Model B+ first impressions

and a worry!

Farnell element14 have just delivered my new Raspberry Pi Model B+, along with some 40-way connectors.

The Pi is destined for C3Pi, my Pi+ Arduino tracked robot. The main benefits of the Raspberry Pi B+ for C3Pi are the extra USB sockets and the reduced power consumption.

I can see all sorts of possibilities created by the 40-way extended GPIO header, but I don't expect to take advantage of those in C3Pi.

Unboxing the Raspberry Pi model B+

Raspberry Pi Model B+
Here is the Pi model B+. It's familiar, yet subtly different from its predecessors. It has a neater look about it and the 2x20 rows of GPIO pins are clearly ready for some serious work.

I have one big question, which I hope to answer shortly: what is the hardware revision of the new board?

Will some Python libraries crash on the Model B+?

The board revision matters more than you might think. Back in the days when I was running Quick2Wire I came up with a little Python script you could run on a Raspberry Pi to find out if it was a Rev 1 or Rev 2 board. This mattered because the GPIO pin functions changed slightly, so our GPIO and I2C code needed to know.

The wonderful people at Adafruit liked the code, and used it (with due acknowledgment) in their libraries.

My script was a bit of a hack, though, and a new board type might just cause it to crash out with an 'unknown board type' result. So my next job is to see what happens when I run it on a model B+.

Follow @rareblog on twitter, or follow +RAREBlog on G+ to find out the result!


Saturday, 12 July 2014

Great service from Tayda Electronics

Shrimping factory
One great strength of the Open Source community is our willingness to share information.

Whether it's a new technique, a new program or a new supplier, we're happy to tell others what we've discovered.

Shrimping with Tayda

Cefn Hoyle's Shrimping It! website offers excellent value for people who want to build the Shrimp low-cost Arduino clone. I got the supplies for the Spa Shrimping session from my usual UK suppliers, but it would have been cheaper to get them from Cefn.

The Shrimping It! site also tells you about Tayda Electronics. That's the company from whom the Makers of Morecambe buy supplies.

I decided to try Tayda and placed a small order a few days ago.

Fast delivery

The Tayda website is clean, fast-loading and easy to navigate.

28 pin ZIF
Their prices are very competitive, but I was worried that my order would take a long while to arrive. Tayda are based in Bangkok and Colorado, and I live in the UK.

I need not have worried. My order arrived within a week. That's fine when I am buying the parts for a workshop. The savings make the slight delay worthwhile.

One component I ordered was a 28-pin 0.3" width Zero Insertion Force (ZIF) socket. This cost $1.39. Most UK vendors don't stock them, and most of those those that do charge £2.50 or more.

Conclusion

If you need reliable and inexpensive components, and can wait a few days, take a look at Tayda.

I'd love to learn about your bargain suppliers; if you have one to share, please leave a comment below.


Monday, 7 July 2014

The Intelligent Breadboard project gets under way

I've made a start on a project that I have had in mind for years - the Intelligent Breadboard, or TIB for short.

TIB will look like a conventional breadboard, but its sockets will be connected to a set of port expanders. These in turn will be controlled by a microcontroller.

You build your prototype on the breadboard in the usual way, and without applying power to your prototype, you'll instruct the microcontroller to check what is connected to what. If that matches what you expected, you'll apply power and check once again that the voltages are as expected.

If you used Fritzing to design your breadboard layout, you'll be able to verify that the netlist from Fritzing matches the connections on the board.

TIB will eliminate (or at least instantly detect) a lot of common breadboarding errors: missing connections, extra connections, wrong connections and loose connections. I expect it to speed up my prototyping significantly.

Arduino + port expander
The early prototype will use an Arduino as the controller and Quick2Wire boards as the port expanders.

I designed all the Quick2Wire boards so that they could work at 3.3 volts when connected to the Raspberry Pi or 5v when connected to an Arduino.

Today I tested the Arduino option for the first time, and thank goodness everything worked!

The photo shows the Arduino controlling a Quick2Wire MCP23017 port expander, which in turn is driving a 5v LED.

Thursday, 3 July 2014

The Raspberry Pi meets MicroPython

One of the high spots of the Open Technology Workshop session at Cambridge was the chance to see and buy a MicroPython board (pyboard).

I've shown it to a few people, and it's always enchanted them, but today I introduced it to its big brother, the Raspberry Pi.

Connecting the Pi and the pyboard

I connected them using one of Pimoroni's excellent SparkFun Cerberus USB Hub Cables.

Py and piboard
As soon as I powered up the pyboard its filesystem appeared on the Pi desktop. Next I  used screen to open a serial session running Python on the MicroPython board.

The pyboard has an on-board filesystem, and can also use a micr0SD card, so you're not restricted to command-line programming. Python programs can access four LEDs, a button, the file system, some GPIO pins, the serial port, an I2C bus and SPI.

Interactive Python on the pyboard

In the screenshot below, I'm driving an interactive Python session on the pyboard from a screen window on the PI.


Raspberry Pi screen session running Python on the pyboard

My next step will be to use PySerial on the Pi so that a Python script running there can control the pyboard.

Arduino e-course is filling up fast!

There are just two places left on next week's course!

After that, when you ask to enrol on the course you will be booked on the next free e-course which will start in late July/early August.

SK Pang's component kit for the course
The welcome email for next week's course will be going out tomorrow. It includes details of the components you need for the experiments in weeks three four and five.

I've arranged for these to be available as a kit from SK Pang for just £9.90 + VAT and shipping.

I'll post a link as soon as the kits are in the Shop.

On the course you will learn how to
  • use the serial port to communicate between your computer and the Arduino
  • write a simple library that you and others can reuse in multiple projects
  • control a family of LEDs to display ripple patterns and binary numbers
  • communicate with the outside world by making sounds from inside your sketches
  • respond to light levels using an LDR sensor


Wednesday, 2 July 2014

Shrimping feedback, please!

I'm planning on running some more Shrimping workshops later this year.

We had a useful five minute retrospective after the Session at SPA, but I have a few extra questions I'd like to ask.

If you attended the session and can give me five minutes of your time, the survey is here.

Tuesday, 1 July 2014

The Shrimping went swimmingly

SPA feedback
Yesterday's evening session at BCS SPA went wonderfully well. The chart below shows feedback from the participants, with a scale that runs from Cr*p on the left hand side to Excellent on the right.

One participant clearly felt let down, and I wish I knew what upset him. The the majority rated the session as excellent, and a couple wanted to give it 11/10 :)

The participants were fantastic - lively, responsive and friendly. Just about everyone got their Arduino clones working; the one unresolved problem was almost certainly due to a hardware issue.

I'm still glowing from one comment, which I found in my inbox this morning:

'I had so much fun this evening - it was like being a little child again!'.

We used my new eBook as the construction guide. If BT lets me access the Internet all day, (not a certainty, I fear)  I will make a few urgent corrections to the eBook later. If you've already bought a copy you will be notified by email when the corrected version is available for download.

I have several less urgent updates to make, and will be re-shooting the pictures of construction. I'll release those in a new update early next week.

Several of the participants asked what do I do next? Here's my suggestion.

I'm about to test an experimental eMail-based course for Arduino experimenters.

There will be five emails, one a week, containing experiments to do with an Arduino or clone. I hope to start the course next week.

The first two need no extra hardware. The first lesson will contain a list of the hardware you will need later, together with sources.

The course is free, and the hardware should cost about £15/$22 including postage. If you're interested,  sign up. I won't spam you.