Posts

Showing posts with the label Raspberry Pi

Lazydoro is working again!

Image
Yesterday things looked tricky. I realised this morning that I could easily fix the problem I've been having with lazydoro and my new chair. Doh! All it took was an adjustment to the distance threshold. Lazydoro is now sitting by my keyboard and keeping a watchful eye on me. lazydoro back at work Next steps: keep a log of Pomodoros completed/broken.

Lazydoro migrates to the Pi

Image
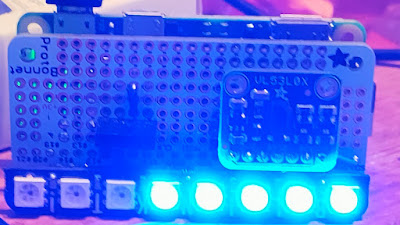
In the previous blog post I described cushadoro and its successor, lazydoro Mk 1. That was the first version of lazydoro, implementedin CircuitPython and based on the Adafruit Trinket M0. Today I'll describe the next stage of the project, a Raspberry Pi-based version. I made real progress but, as you'll see, lazydoro was still not quite good enough. Lazydoro needed unit tests At the point were we left the project the Python code had become a little complicated. I thought I ought to do more automated testing. It's possible to do that on CircuitMpython devices like the Trinket M0, but it's a lot easier if you canuse the standard Python libraries, including Python's unittest and mock frameworks. I decided to migrate the project to a Raspberry Pi. Moving to the Raspberry Pi Explorer HAT prototype At the time I migrated the project I had just fallen in love with Pimoroni's brilliant Explorer HAT pro . The HAT has loads of useful peripherals, an...
Time to retire my Rapsberry Pi Tensorflow Docker project?

I need your advice! Six years ago I did some experiments using TensorFlow on the Raspberry Pi.   It takes hours to compile TensorFlow on the Pi, and when I started the Pi platform wasn't officially supported. Sam Abrahams found his way thorough the rather scary compilation process, and I used his wheel to build a Docker image for the Pi that contained TensorFlow and Jupyter. That made it easy for users to experiment by installing Docker and then running the image. I was a bit anxious, as that was my first docker project, but it proved very popular. Things have change a lot since then. For a while, the TensorFlow team offered official support for the Raspberry Pi, though that has now stopped. You can still download a wheel but it's very out-of-date. I recently discovered Leigh Johnson's post on how to install full TensorFlow on the Pi. It's slightly out-of-date but the instructions on how to compile it yourself probably still work. Most Pi-based AI projects now use Tens...

More Raspberry Pi Pico experiments

Image
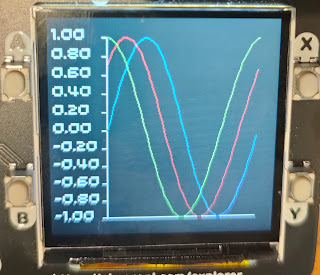
If you're exploring the Raspberry Pi pico, here are some more resources MicroPlot I've started a new project called MicroPlot. It's been developed on the Pico though it will eventually work on other  micro-controllers and computers. It's a minimal plotting package and it already has enough functionality to be useful. It will plot simple line plots; the first example below is a series if sine waves and the second shows the voltage across a capacitor as it charges and discharges. Plotting Sine waves Capacitor charging and discharging MicroPlot has its own project on GitHub. You can read about it and download the code at https://github.com/romilly/microplot and I will be soon be using it for some more electronics experiments. Using the UART The current MicroPython documenation for the Raspberry Pi Pico is a bit thin on detail about using the UART. I've added a short example in my pico-code project on GitHub. The Tiny2040 is available from Pimoroni! Pimoroni Tiny2040 I...

MicroPython development on the Raspberry Pi Pico

Get Started with MicroPython on Raspberry Pi Pico  suggests that you use the Thonny editor for development. Thonny will get you off to a quick start, but you may have an alternative editor you'd prefer to use. Lots of my friends now use VS Code; some are vim or emacs experts; many, like me, use PyCharm as their normal Python development environment. I find it more comfortable to use my normal editor for MicroPython development, but I have more compelling reasons. The first is refactoring support. I'm learning as I go, and I often want to improve the design of my code libraries as I come to understand things better. PyCharm does a very good job of refactoring Python code. There's another issue to do with version control. I'm currently sharing my Pico code on GitHub. That means I need to keep code on the Pico in sync with the code on my workstation. I haven't found an easy way to do that with Thonny, so I am using another tool to move and test code. rshell was my fi...

Raspberry Pi Pico project 2 - MCP3008

Image
This post show you how to drive the MCP3008 8-channel ADC using a Raspberry Pi Pico. I'll start with a personally embarrassing and annoyingly relevant story. I'll also tell you about a minor 'gotcha' when using SPI on the Pico, and how you can avoid it. Finally, I've include the code and fritzing diagram I used to test the interface. First, the story. Back in 2012, when the Raspberry Pi was fresh and new, I was running a startup called Quick2Wire.  We made add-on boards for the Pi. Just before Christmas we sent out our first batch of boards to a small army of beta-testers. The beta boards didn't work. Somehow a single trace on the pcb had got deleted and one of the GPIO pins was isolated. The boards were still usable and it wasn't too hard to solder in a jumper wire to replace the missing trace, but it was very embarrassing. It wasn't just that we'd shipped boards with a defect. The really annoying thing was that I'd set up an  automated loop-bac...

Raspberry Pi Pico - simple projects

Image
Introducing fungen - an AF function generator. Lots of pioneers are now creating tutorials and sample projects for the Raspberry Pi Pico and the Pimoroni Tiny2040. One of my first mini-projects is fungen - a Pico-based AF (audio frequency) function generator that uses the Pico's PIO (programmable I/O) to generate a waveform. The Pico's head start The Pico was announced just a few days ago. It arrived out of the blue complete with lots of interesting add-ons available, and with excellent documentation. The reference documentation is full of useful examples, including several that take advantage of the Pico's powerful PIO. PIO allows users to set up custom input-output capability, and one of the examples shows how to use PIO to implement PWM (Pulse width modulation). The Pico already has plenty of PWM-capable pins, but I wondered if I could hack the PWM code to turn the Pico into a simple signal generator. Indeed you can, and that's how fungen works. I made a couple of mi...

Pi Pico emulating an Etch-a-sketch

Image
  One Christmas, long, long ago, someone gave me an Etch-a-sketch . I was a bit of a klutz then (indeed, I still am). I never produced great works of art, but the Etch-a-sketch was a lot of fun to play with. Yesterday I wondered how easy it would be to emulate an Etch-a-sketch using the Raspberry Pi Pico. Using PySerial to link Pi and Pico I’d just finished yesterday’s article about how to link a host to the Pico using PySerial. Why not get the Pico to print out how far two potentiometer knobs were turned,  read the output on the Pi using PySerial,  and use the Turtle package on the Pi to create the display? It sounded too simple to work, so I started coding with some trepidation. The first job was to connect a couple of potentiometers to the analogue inputs of the Pico. After that I wrote a short MicroPython program which read the analogue values and printed them out. Here it is: import machine import utime pot_l = machine.ADC( 27 ) pot_r = machine.A...

Controlling a Raspberry Pi Pico remotely using PySerial

Image
Update : I'm using thie code below in another project, and found that I had not correctly fixed the reported bug. The new version passes automated tests, and I am pretty sure it works OK. I have changed the name of the class to Talker  since it can both send and receive information. Apologies to all concerned for the bug! Introduction You can use a Raspberry Pi Pico as a powerful peripheral to a host - a Raspberry Pi, a Jetson Nano, a laptop or workstation. In this article you'll see how to interact with a Pico running MicroPython or CircuitPython by writing some Python code that runs on the host. The software is easy to use. It enables you to send a Python statement to the Pico and read the results. The statement can be any valid MicroPython code. Setting up the host and the Pico For this article I've used a Raspberry Pi as the host, but any computer running Windows, Linux or Mac OS will do so long as it has Python 3.5 or later installed. In particular, you can use this t...

Which Python should you install on your Raspberry Pi Pico?

Image
 The new Raspberry Pi Pico sold out soon after launch. One of the reasons it's so popular is that you can program it in Python. There are two versions of Python to consider: MicroPython and CircuitPython. Fortunately they are very easy to install or replace and they are very similar. Let's compare them so you can decide which to use. The Official guide to the Pico  (reviewed here )recommends that you install the official version of MicroPython. MicroPython has been around since 2014 , and it's been ported to quite a few boards. It was  created by Damien George, and he is responsible for the port to the Pico. If you're starting with MicroPython and  want to work your way through the Official Guide, use the official version. If you've been using MicroPython for a while you've probably heard of CircuitPython . It's based on MicroPython but  adapted by the inventive folk at Adafruit.  CircuitPython lets you run the same program on any supported board without ...

Five ways to connect Raspberry Pi and Pico

Image
The Raspberry Pi and Pico are each very capable, but sometimes you'll want to connect them together. For example, if you're building a robot you may want to use the Pi for computer vision, while relying on the Pico for predictable response times.  How can you get the Pi and the Pico to talk to each other? There are several possibilities, each with their own characteristics. You can connect them with a USB lead and use Thonny to talk to the Pico. That's very easy; it just uses the MicroPython REPL to control the Pico, bit it's very limited. If you've used the REPL to turn the Pico's on-board LED on and off, you've use this option already. You can connect the Pi to the Pico via USB and use a library called PySerial to send and receive data using a Python program that you write. That's a bit harder but much more flexible. You can connect the Pi and the Pico using their TTL serial interfaces - possible in theory, though I can't see much reason to do thin...

Review: Get started with MicroPython on Raspberry Pi Pico

Image
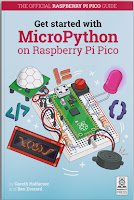
If you want to explore the Raspberry Pi Pico you'll find it really easy to get started. On the day of the announcement the Raspberry Pi  Foundation released excellent documentation.The Raspberry Pi press also published a great starter guide:  Get started with MicroPython on Raspberry Pi Pico . It's a super book. The authors are professional journalists and experienced Pi enthusiasts, and it shows! The book covers everything a beginner needs to know to start exploring Physical Computing with the Pico. A guided tour of the Pico Chapter 1 starts with a guided tour of the board. Next it explains how to solder the headers you'll need if you want to use the Pico with a breadboard. The soldering instructions are clear enough for a novice to follow. The book wisely warns younger users to make sure they are supervised by an adult. It's easy to burn yourself badly with a hot iron while you're learning. The chapter finishes with clear instructions that tell you how to install ...

Getting started with the Raspberry Pi pico

Image
I'm always excited when Eben Upton pulls another Raspberry Pi rabbit out of his capacious topper. Last week he announced the $4  Raspberry Pi pico . It's a unique product for several reasons, and I put an order in as soon as I saw the announcement. It's easy to get the pico going The pico's on-line documentation is superb and it's supplemented by an excellent and inexpensive book from Gareth Halfacree and Ben Everard. I did hit one minor 'gotcha'. I've been working on my main workstation which runs Linux Mint, and discovered the hard way that the Thonny Editor won't install properly if you're using Python 3.5 Python 3.5 has reached end-of-life, but it's still the default on Linux Mint 18.3. If I want to use a later version I have to set up a virtual environment. Once I did that, Thonny installed perfectly and within a couple of minutes I'd created a Hello World script and run it on the pico. If you're using a Raspberry Pi to program ...

An Adafruit proto Bonnet for the Raspberry Pi, Jetson Nano and Grove I2C

Image
babelboard bonnet Adafruit's protoBoards lets you make a bread-boarded design permanent, and Seeed Studio's Grove system lets you wire up a prototype really quickly. In this half-day project I combined the two to create a simple, cheap, flexible prototyping system for the Raspberry Pi and Jetson Nano The Grove system is based on standard 4-way connectors which can be used to connect digital, analogue and I2C-based components. I've focused on I2C since most of the robots I build use I2C to interact with their environment. I mentioned the Jetson Nano - a hot topic at the moment, as NVIDIA have just announced a low-cost 2 GB version of the Nano which will be available at the end of the month. One of the clever features of the Nano is that it has a Pi-compatible header, so the bonnet will work on the Nano without modification. Fritzing the design I started by laying out an Adafruit bonnet design using Fritzing. The design is really simple. All it does is connect the pins of the...

Mu, Edublocks and the Kitronik Inventor's kit

Image
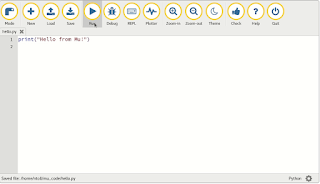
A friend of mine recently asked me about Python programming on the micro:bit. I told him that I wrote a free workbook about that a while back. (If you'd like to get a copy you can sign up here ).   It's based around the excellent mu editor . Code with Mu Mu is a no-frills editor that you can use to develop and run programs on the micro:bit , Adafruit CircuitPython boards , the Raspberry Pi and other Python environments Mu has just enough features to be usable without being daunting. I love it. But some young students find text-based programming a bit scary. How can they get started? Code with Edublocks Some younger programmers are happier with block-based (visual) programming. For them, Edublocks is a great solution. Edublocks is block based, runs in your browser, and looks like the popular Scratch environment, but it's Python-oriented . Here's the Edublocks version of the code for the first experiment for Kitronik's excellent micro:bit Inventor's Kit ....

Explorer HAT update on its way!

Image
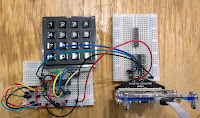
HAT and Keypad I am about to update my book about Pimoroni's excellent Explorer Hat. I've finished the code and the Frizing diagrams for all the planned projects. The next step is to write the remaining chapters that describe them, and I hope to publish a couple of those later this week. The image on the right shows one of the new projects: a 12-key numeric keypad controlled by the Explorer HAT. The price for the book is still just $5 (+ VAT for EU buyers) but I'll have to raise the price once I've added more content.  You can buy the book through LeanPub, so you get a 45-day no-hassle money-back guarantee and you'll get future updates to the book at no additional cost! If you want to make the most of the Pimoroni HAT, don't wait - get the book while the price is still just $5!

Quantum Computing with qiskit on the Raspberry Pi

Image
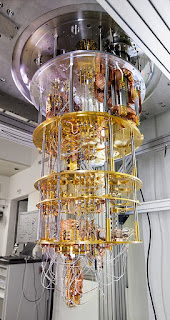
IBM Quantum Computer Quantum Computing is fascinating, and you can now explore it with a Raspberry Pi! IBM have created Qiskit , a very accessible Python-based framework for Quantum Computing. You can install qiskit on Linux, OS X and Windows platforms. You can even install it directly on the Raspberry Pi, though the installation is a little tricky and takes quite a while. ( Image copyright IBM ) Qiskit supports the IBM Quantum Experience - a collection of tools and tutorials that enable you to learn about Quantum Computing. You can explore qiskit via the web or install a local copy. You can even submit your own Quantum Circuits to run on IBM's publicly available Quantum Computers.  If you're looking for interesting STEM topics to explore, Quantum Computing is worth a look. If you can use a jupyter notebook to run simple Python code you can explore the qiskit examples. If you have a basic background in linear algebra and complex numbers you can understand the...

Muliplexing I2C with the Adafruit TCA9548A multiplexer

Image
I want to attach multiple VL53L0X Time-of-flight sensors to a single I2C bus. It looks as if that should be easy, but it's not. One solution involves disabling the sensors and then enabling them one at  a time to change their address. It's workable, but fiddly. If you only have two sensors you could use different I2C buses, but I eventually want to run 8 sensors, so that won't work. The TCA9548A I2C multiplexer There is another approach that is easy to implement and works out of the box. The TCA9548A is an I2C device that acts a little like a telephone exchange. You can use it to route I2C transactions to one of eight separate I2C busses. That allows you to have eight devices with the same I2C address, one on each bus. I did a first experiment using an Adafruit CircuitPython m4 feather. That worked well, and I've just confirmed that it works just as well with a Raspberry Pi. Since I'm using Adafruit's CircuitPython libraries, the same code run...

An I2C keypad for the micro:bit - part 2

Image
A working prototype I've now got a home-brew Arduino clone reading the keyboard and sending key-presses to a micro:bit using I2C. Preparing the Arduino clone was trickier than usual. As I mentioned in yesterday's post , the Arduino needs to run at 3.3 volts. That's the working voltage (V cc ) for the micro:bit, the Pi and the Jetson Nano. Connecting I2C lines from a 5v device would damage them, so 3.3 v operation is essential. I have a good stock of ATmega328P chips left over from the days when I was running Shrimping workshops. The ATmega328P  works well at 3.3 volts, so long as the clock frequency is no more than 8 MHz . Most Arduinos run at 5v with a clock speed of 16 MHz, so there's work to do.   8 MHz clock issues If I2C is to work reliably at 8 MHz the Arduino needs to be configured for an 8 MHz clock, and it needs a bootloader that works at that clock rate. My first step was to wire up a working clone on a breadboard with an 8 MHz crystal and i...

Adding a DS1307 Real Time Clock to Raspberry Pi

Image
Grove RTC The DS1307 RTC (Real Time Clock) is widely available, but adding one to a Raspberry Pi turned out to be a bit of a Yak shave. I'm gradually adding code and wiring instructions to my babelboard hardware and software projects, and I thought it was time to cover an RTC. I had a Grove RTC board from years ago and decided I'd document connecting that to a Raspberry Pi. The need for Battery Power First Yak Shave moment: RTCs normally use a coin battery to maintain power so they can keep time when their host is off, and the battery in my Grove board was way past its use-by date. This happened on Sunday evening, and the local supermarkets were shut, but the local convenience store was open. No CR1220, though, so I had to wait until the next day to get started. While I was waiting I read the data sheet for the DS1307 chip and realised I had another problem. Don't connect this chip directly to your Pi! Seeed Studios describe the DS1307 breakout as P...