Pages

Monday, 30 March 2020

Build details for Anastasia

I've uploaded pdf files with full build instructions for Anastasia the micro:bit robot and the power strip I made for her.

These are free/immediate downloads, no email required.

Links:

Build Anastasia the micro:bit robot
Power Strip Build Guide


Saturday, 14 March 2020

Bill of Materials for Anastasia - build instructions coming soon.

I've added a Bill of Materials for Anatasia the home brew micro:bit robot in her GitHub project. They are in the project README.

I'll add building instructions here and on GitHub over the week-end.

Meanwhile, here is a video showing her in action:


Wednesday, 11 March 2020

Driving Anastasia's Kitronik motor controller via radio

Anastasia with the controller
This is the fourth in a series of articles about Anastasia - a home-brew robot based on the micro:bit.

In my previous post I shared the micropython code that runs on Anastasia's remote micro:bit controller.

The controller can send one of five commands to Anastasia:
  1. stop applies a brake to the motors.
  2. left spins the robot anti-clockwise.
  3. right spins the robot clockwise.
  4. forward ( you guessed it1) drives the robot forwards.
  5. backward also does what you'd expect.

In this post I'll step through the code than implements these commands on Anastasia.

The code looks for incoming radio messages. It translates those messages into methods on a Driver class. These methods then send control signals to the  Kitronik motor controller.

Here's Anastasia's code


The code starts with the necessary imports, and then begins the definition of the Driver class.

from microbit import *
import radio


class Driver:
    """
    Read incoming radio messages and send commands to the motor controller.
    """
    def __init__(self, left_pins=(pin16, pin0), right_pins=(pin8, pin12)):
     
        self.pins = left_pins+right_pins
        radio.on()
        self.commands = {
            'stop' :    self.stop,
            'forward':  self.go_forward,
            'backward': self.go_backward,
            'left':     self.spin_left,
            'right':    self.spin_right,
        }


The Driver's __init__ method allows you to pass in the pins you use to control the motor, but has default values recommended by Kitronik in their documentation for their Motor Controller.

The left and right motor pins are concatenated and stored in the pins instance variable which is used later.

The commands variable contains a dictionary which maps text commands to methods on the driver class.

Let's look at the definitions of the methods.


    def stop(self):
        self.set_control_pins(1, 1, 1, 1)

    def go_forward(self):
        self.set_control_pins(0, 1, 0, 1)

    def go_backward(self):
        self.set_control_pins(1, 0, 1, 0)

    def spin_left(self):
        self.set_control_pins(1, 0, 0, 1)

    def spin_right(self):
        self.set_control_pins(0, 1, 1, 0)


Each method uses the set_control_pins method to apply high (1) or low (0) voltages to the pins that are connected to Anastasia's two motors.

Here is the set_control_pins method:

    
    def set_control_pins(self, *pin_values):
        for pin, pin_value in  zip(self.pins, pin_values):
            pin.write_digital(pin_value)


Handling commands


When Anastasia tries to read a command over the radio it will either get the next command as a text string, or None if no command has been received.

The obey method does nothing if its argument is None. If a message has been received obey looks it up in the commands dictionary. If it's an unknown command obey ignores it.

If it's a known command obey translates the command to the corresponding method. Then the method is executed.

    def obey(self, message):
        if message is None or message not in self.commands:
            return
        # execute the method if a valid message was received.
        self.commands[message]()


The run method loops forever, looking for a message to obey every 50 milliseconds.

    def run(self):
        while True:
            self.obey(radio.receive())
            sleep(50) # 50 ms


Finally, the script creates a Driver instance and tells it to start running.

Driver().run()

That completes the second iteration of my Anastasia project. For the next step there are two possibilities.

  1. I could add a VL53L0X ToF (Time of Flight) LIDAR sensor.
  2. I could replace the micro:bit with the more powerful Adafruit Clue.
Let me know which you'd prefer to see next by posting a comment here or in the micropython and micro:bit group on Facebook.

Tuesday, 10 March 2020

Controlling Anastasia from a second micro:bit

This is the third in a series of four articles about Anatasia, a home-brew micro:bit based robot.

Here's the full list of articles:

1. The original article introducing the robot.
2. A short update when I released the code on GitHub.
3. This detailed walk-though of the controller code.
4. A detailed walk-through of the code that runs on the robot

The code for Anatasia and her controller is finished. It's simple and it's all working well.

You control Anastasia via a separate hand-held micro:bit, which communicates using the micro:bit's built-in radio.

You tilt the controller and Anastasia responds by advancing, retreating or spinning to the left or right. Anastasia stops when you hold the controller level.

Here's the controller code:

Controller Code


The controller code starts with a bit of set-up

from microbit import *
import radio

radio.on()
# The critical value for tilt detection.
# A lower value makes the controller more sensitive.
RANGE = 250

Next, the say function checks to see if there is a command to send and sends it if necessary.

It returns a boolean value which tells you whether anything was sent.

def say(command):
    if command is not None:
        radio.send(command)
        return True
    return False

The micro:bit has a built-in accelerometer which can be used to detect if the micro:bit is tilted or level.

react_to_tilt checks a value to see how much the micro:bit is tilted.

If the size of the tilt is less than the RANGE value the tilt is ignored. If the tilt is big enough, the appropriate command is returned.

def react_to_tilt(tilt, low, high):
    if tilt > RANGE:
        return high
    if tilt < - RANGE:
        return low
    return None

The check_tilt function measures the tilts in the x and y directions and sends the appropriate command over the radio.


def check_tilt():
    if say(react_to_tilt(accelerometer.get_x(), 'right', 'left')):
        return
    if say(react_to_tilt(accelerometer.get_y(), 'forward', 'backward')):
        return
    # micro:bit is more or less level, so stop the robot.
    say('stop')


The final while loop runs forever. It looks for commands to send ten times a second.

while True:
    sleep(100) # on the micro:bit, times are in ms
    check_tilt()


I'll explain Anastasia's code tomorrow. If you can't wait, the code is already on GitHub.

Monday, 9 March 2020

Anastasia is a simple home-brew robot - now on GitHub

Anastasia V1
Anastasia (my latest home-brew robot) is now on GitHub.

The code is described in a series of articles on this blog. I've listed them at the end of this post.

I've made rapid progress with Anastasia and will do more work on her today.

Anastasia is currently driven by a pair of micro:bits. The motor is managed by an on-board micro:bit connected to a Kitronik motor controller and I control Anastasia over radio using a second micro:bit.

Anastasia is working, but needs some minor enhancements to the code and electronics. I may also need to replace the motors which run a bit unevenly. Once I've done the upgrades I'll post a video of Anastasia in operation.

Soon I'll replace the on-board micro:bit by an Adafruit clue which will be controlled via Bluetooth.

Eventually I'll add an on-board camera.

Articles in this series:

1. The original article introducing the robot.
2. This short update.
3. A detailed walk-though of the controller code.
4. A detailed walk-through of the code that runs on the robot.

Saturday, 7 March 2020

How to program a simple homebrew micro:bit-based Robot

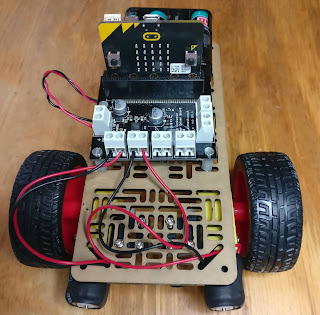
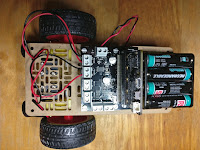
This afternoon I assembled a simple micro:bit mobile robot.

It uses the Kitronik motor driver board and some Adafruit motors.

I like the Kitronik board. It's easy to use, well documented, and the build quality is good.

I'll be making some minor mods over the next couple of days. It needs a ToF Lidar sensor to make sure it doesn't bump into things and I plan to power it from a phone charger battery with an additional on-off switch.

I'll use a second micro:bit to control it via radio.

Update! There are now four articles in this series, and the robot has been named. It's called Anastasia.

Here are the articles:

1. This introduction.
2. An short update when I released the initial code on GitHub.
3. A detailed walk-though of the controller code.
4. A detailed walk-through of the code that runs on the robot.

Simple control code


The test code I wrote to check the wiring was very simple.


from microbit import *

left = (pin16, pin0)
right = (pin8, pin12)

forward = (0, 1)
backward = (1, 0)
coast = (0, 0)
brake = (1,1)

def set(side, direction):
    for i in range(2):
        side[i].write_digital(direction[i]) 
 
# wait for button A to start
while True:
    if button_a.is_pressed():
        sleep(10)
        break

set(left, forward)
set(right, forward)
sleep(2000)
set(left, brake)
set(right, brake)
sleep(500)
set(left, backward)
set(right, backward)
sleep(2000)
set(left, brake)
set(right, brake)

Clued up soon


In the longer term I'll replace the micro:bit with an Adafruit Clue and add some more intelligence.