Posts

Showing posts with the label Raspberry Pi Pico

How can you make your Pico/Pico W project portable?

Image
In this article you'll learn how to solder the Pimoroni Lipo Shim for Raspberry Pi Pico/Pico W and use it to power your project from a single LiPo battery. You'll also discover a problem, and a solution, if you want to check the battery level remotely. Some Pico W projects need to work anywhere. Wi-Fi takes care of the connectivity, but the projects need battery power to make them truly portable. If you're building a portable project you'll find the Pimoroni Lipo Shim for Pico is a great solution. Here's how to attach and use it. Powering the Pico While you're writing the software for your Pico or Pico are you'll be using a USB cable to linking it to your host. Once your hardware and software are working you may want to free the Pico from its umbilical cord. The Pico can be powered from a battery; it's very adaptable, working off an input voltage that can range from 1.8 to 5.5 volts. The Pimoroni Lipo Shim for Pico takes advantage of t...

Connect the Raspberry Pi Pico to an OLED using Grove breakouts

Image
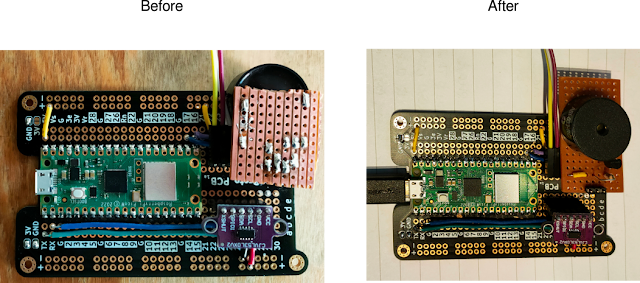
In this short article you'll learn how to make and use a compact, inexpensive adapter that will allow you to connect a Raspberry Pi Pico/PicoW to Grove I2C peripherals. With a Grove to Stemma QT/Kwiic adapter cable, you can also connect your Pico/PicoW to Adafruit and Sparkfun I2C devices. You'll laso learn a useful hack that lets you connect the 2mm spaced Grove adapters to a 0.1" spaced (2.54mm) pcb. Grow with Grove Regular readers will know I love breakout boards. One of the projects that I've been working on is a Raspberry Pi Locator. It reads updates from the @rpilocator RSS feed, and it tells you when and where Raspberry Pi stock is available. The Pico W will sound a buzzer when there's stock around, but it would be great if it could tell you which stores had the Pis. On OLED display would keep things compact, and I thought I'd hook one up. Seeed studios have a great range of Grove breakouts with an easy-to-use connection system, and I knew...

Simple, repeatable deployments in a MicroPython environment

Have you ever suffered from "It works on my machine"? Most of us have, as users (well, it doesn't work on mine!") or as developers ("what have I done wrong this time?".  The cause is almost always down to something that's on the developer's machine that they have forgotten about, but make use of. That something doesn't get included in the installation process, so users may not have it installed. There's a great way to avoid that. Testing an installation process if you have an OS If the software you're developing runs under an Operating System, run the installation in a freshly-created virtual machine. That will ensure that you start without  somethings installed. You'll only have the software that's specified in your installation process. If that works, you're in good shape. What about installing MicroPython software on devices like the Raspberry Pi Pico? Testing an installation process for MicroPython projects A comparabl...

Make your own strip-board breakout boards

Image
A useful trick for Makers In this article you'll see when you should build your own breakout boards, and you'll learn a useful trick to use when making them. Breakout boards rock Digital Makers can often make projects faster by using breakout boards. A breakout board is a small but useful module that you can use to compose your project. There are hundreds of breakout boards available. Many are based on tiny SMD chips that are tricky to solder. You can save time and reduce the risk of mistakes by buying a ready-made breakout board. Here's an Adafruit breakout board I used in the Raspberry Pi version of Lazydoro. Of course, you can only buy a ready-made board if you can find one that does what you need, If there isn't, consider making one! Why bother with self-built breakouts? Why not just put everything you need on the main project board? There are advantages to a design that uses pluggable modules. You can usually test the module on its own, and th...

Ports and Adapters - Struggling back to Beginner's Mind

Image
I have to admit it: I've been struggling over the last two days.  I'm working on a write-up of a Walking Skeleton for Lazydoro, together with sample code for its Ports and Adapters architecture. I often create a Walking Skeleton at the start of an application. Lazydoro is now in its fifth version,  there's already a finished working version, and it's difficult to 'un-know' how it evolved. Trying to create what I might have written at the start has been quite a challenge The process has been valuable, though. I think I understand  Ports and Adapters  better through working on my sample code and explanation, and it's had another benefit. I've set up an automated deployment process which I'll be able to use for future MicroPython projects. Automating deployment Some applications can be deployed as a single file, but small modules are easier to read and test. lazydoro now consists of 9 files in a three-directory tree, and deploying a new version manua...

Raspberry Pi Pico W project plans

Image
Please help me choose! The announcement of the Raspberry Pi Pico W has opened up a huge range of fun, exciting projects. Pico W in the cloud I've a long list of candidates, and I'm hoping for advice about which ones have the widest appeal. The first project is a shoo-in, not least because it's almost finished. I'll tell you about that shortly. I have seven other projects pulling for my attention, and I'll give you a quick introduction to each. Then I hope you can help me chose which to do next, or even suggest an alternative. I'll open up polls on Twitter and Facebook, but I'd also welcome feedback on this blog. Project number One If you're a regular reader of the RAREblog you will already be familiar with Lazydoro, my automated Pomodoro timer. The current version is now running well, but it's based on a Raspberry Pi Zero. I'm migrating the project to the Pico W for two reasons: I want to keep a daily log of my Pomodoros,...