Posts

Document breadboard builds by writing Python code

Image
In my last post I mentioned that I was using breadboarder - a Python program that eases the pain of documenting breadboard-based projects. You write a descriptiopn of your project using a Python-based DSL - a domain-specific language. It lets you explain what wire or component to add to the breadboard, and where to connect it. You write code like this: And it generates markdown and png files which render like this: It saves hours of layout, you can build complex projects out of simple ones, and everything is under source control. I need to improve the documentation but breadboarder is  on GitHub .

Fault-finding breadboarded circuits - a tale from the trenches

Image
blobstar Yesterday I destroyed an Atmel ATMega328 chip. (That's the chip at the heart of the Arduino.) The Atmel chips are very well designed, and it's really hard to damage them, but I've managed it twice in the last decade. Yesterday's episode was due to a mistake in wiring up an Arduino clone that I've been building on a breadboard. The clone is a descendant of Cefn Hoyle's excellent Shrimp design. I decided to build an alternative version which could be programmed using an FTDI cable and made permanent using an Adafruit perma-proto board. The correct layout (shown above) is easy to follow, but my ageing eyes led me to connect two of the power wires to the wrong pins. When I powered up the board using an FTDI cable the LED didn't blink and I knew something was wrong. But what? A simple approach to problem-solving When something stops working, you focus on what's changed. When ...

An Adafruit proto Bonnet for the Raspberry Pi, Jetson Nano and Grove I2C

Image
babelboard bonnet Adafruit's protoBoards lets you make a bread-boarded design permanent, and Seeed Studio's Grove system lets you wire up a prototype really quickly. In this half-day project I combined the two to create a simple, cheap, flexible prototyping system for the Raspberry Pi and Jetson Nano The Grove system is based on standard 4-way connectors which can be used to connect digital, analogue and I2C-based components. I've focused on I2C since most of the robots I build use I2C to interact with their environment. I mentioned the Jetson Nano - a hot topic at the moment, as NVIDIA have just announced a low-cost 2 GB version of the Nano which will be available at the end of the month. One of the clever features of the Nano is that it has a Pi-compatible header, so the bonnet will work on the Nano without modification. Fritzing the design I started by laying out an Adafruit bonnet design using Fritzing. The design is really simple. All it does is connect the pins of the...

Mu, Edublocks and the Kitronik Inventor's kit

Image
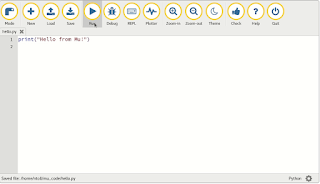
A friend of mine recently asked me about Python programming on the micro:bit. I told him that I wrote a free workbook about that a while back. (If you'd like to get a copy you can sign up here ).   It's based around the excellent mu editor . Code with Mu Mu is a no-frills editor that you can use to develop and run programs on the micro:bit , Adafruit CircuitPython boards , the Raspberry Pi and other Python environments Mu has just enough features to be usable without being daunting. I love it. But some young students find text-based programming a bit scary. How can they get started? Code with Edublocks Some younger programmers are happier with block-based (visual) programming. For them, Edublocks is a great solution. Edublocks is block based, runs in your browser, and looks like the popular Scratch environment, but it's Python-oriented . Here's the Edublocks version of the code for the first experiment for Kitronik's excellent micro:bit Inventor's Kit ....

Build your own Arduino clone - updating the Shrimp

Image
A Shrimp assembled A while ago I ran a series of workshops showing how to build your own Arduino clone, based on a low-cost e-book called Making the Shrimp.   The book needs an update and I'm looking for reviewers. They will get a free copy of the book and a free kit to build. If you're interested, sign up here .

Getting started with Pimoroni's Tiny 4WD Rover

Image
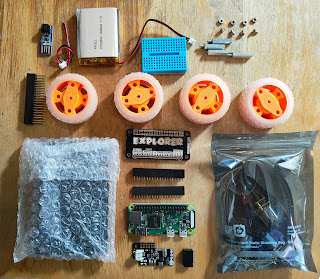
Kit contents with extras I just finished my book on the Pimoroni Explorer HAT, and I'm celebrating! I have treated myself to a Tiny 4WD Rover kit. It looks a lot of fun, and should be simple to assemble. The product page has a link to a great blog post from Emma Norling which has detailed build instructions. I'll be following that closely. I have already encountered one  minor gotcha . You need a few extras over and above the parts in the kit. Some of them are mentioned on the product page (battery, Pi zero W), but Emma found she needed spacers to mount the Explorer pHAT on the Pi zero W. I have suitable spacers in stock so I think I'll be OK. I also got a LIPO shim and a USB charger. Once I've completed the build I'll document it and provide a link on this blog. A nice bonus if you hurry!  Pimoroni are currently offering a free Pi Zero WH for customers spending more than £100 (excluding postage). The offer ends soon, but I managed to get my order in on time whic...

Explorer HAT tricks is nearly finished!

Image
If you're thinking of experimenting with the Pimoroni Explorer HAT,  Explorer HAT tricks is a great place to start. It covers over a dozen simple projects, complete with Python code, and you won't need to do any soldering. If you're an experienced Pi user, you probably feel you don't need it, and that's fine. But if you're just starting out with Physical Computing, or new to the Explorer HAT, it's well worth a look, and there's a free sample available . The book is now over 80% complete. You get the book from Leanpub, which means that you get updates free whenever the book changes. The book was written for use with the Pimoroni Explorer HAT Pro but Pimoroni are currently offering a great deal on their Electronics pHAT kit . The kit costs just £19.92 including a Raspberry Pi zero. ! I've ordered one to experiment with. I know a couple of the projects in the book will need to change, but almost all of them will work unmodified. I'll write up what ...