Neural networks on the Raspberry Pi: The Neuron
A brief introduction to ANNs - part 1
ANNs (Artificial Neural Networks) are systems that can process information using connected components called neurons. ANNs are inspired by real (biological) neural networks like the brain.
ANNs are widely used for real-world information processing tasks. In the image below (courtesy of Google Street View) you can see that car number plates have been blurred. Google hides them to protect privacy, and the software that recognises what to blur is a Neural Network.
 |
| Image courtesy Google StreetView |
The software
As I said yesterday, I developed the software in APL on a Raspberry Pi. You’ll find instructions on how you can run it further down.
Neurons
An ANN is made up of neurons. Neurons are usually grouped into one or more layers. Many types of neuron have been proposed, but they all have certain characteristics in common.
A neuron has one or more inputs and a single output. Associated with each input is a weight. Almost all neurons determine their output by adding together their weighted inputs and applying an activation function.
Here’s a diagram of a single neuron:
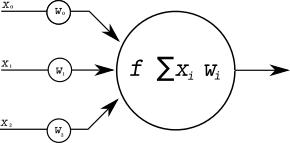
The values x0, x1, x2 are the inputs and w0, w1 and w2 are the weights. The neuron multiplies each input by the corresponding weight, adds them up, and applies the activation function f to determine the output. We often refer to the sequence of inputs as the vector x, and the sequence of weights as the vector w.
Running the code in APL
If you want to run the APL code as you read this article, you can use the tryapl.org website or a copy of Dyalog APL. If you are just going to use APL for non-commercial purposes you can get a free copy of Dyalog for the Raspberry Pi, and you can get low-cost licenses for Windows and Linux computers.
If you’re going to use tryapl.org, you can copy individual lines of APL below and paste them into the coloured bar on the webpage. If you want to try different expressions, you can click on the APL keyboard button on the top right of the tryapl,org web page. This will allow you to enter special APL symbols, like ← and ×.
If you’re going to use Dyalog APL on the Raspberry Pi, start with the reference guide. It will tell you how to install and start APL and point you at other reference materials.
Let’s get started!
An example
You’ll start by calculating the output of a typical neuron.
Assume the neuron’s inputs are 3.5 2 0.7 and 1.2.
Assume also that the associated weights are 0.5 0.3 0.1 0.2.
Finally, take the activation function f to be a function that doubles its argument.
In APL, create the variables x and w. (You can enter a vector by separating its elements by spaces). In APL you assign a value using the leftward arrow ←, so enter and execute these two lines of code
x ← 3.5 2.0 0.7 1.2
w ← 0.5 0.3 0.1 0.2
Now multiply x by w. APL uses the ×sign for multiplication. Take care to distinguish the letter x (which you’ve used as a variable containing the input vector) from × (the multiplication sign).
Enter
x × w
APL should respond by typing the result:
1.75 0.6 0.07 0.24
Notice that APL has iterated through the vectors, element by element, without you having to write a loop.
Note for the curious: You might like to predict, and then try, what would happen if x and w had different lengths.
Reduction
The output of your neuron should be the sum of those numbers, doubled because you’re using the ‘times two’ function for this neuron.
How can you add up the elements of the vector? If you’ve used languages like Python, Clojure or Haskell, you’ve probably come across reduce or fold. These can be used to repeatedly apply a given function between the elements of a vector.
APL has a similar feature. The plus reduction of a vector will calculate its sum.
You write the plus reduction of x like this:
+/x
The result should be 7.4 but of course you don’t want to sum x. You want to sum x times w.
Enter +/ x×w and you should see 2.66
You haven’t yet applied f, the ‘times two’ function that I specified. Here’s the complete calculation, followed by the result that APL should display
2×+/x×w
5.32
Order of execution
You may be curious about the order in which APL carries out its calculations.
Most of us learned a set of rules when learning arithmetic at school: brackets first, then divide, then times, then minus, then plus. APL takes a simpler approach. Here’s the reason why.
If you’ve programmed in a language like Python C or Java, you will know that they have their own complex set of rules to work out the order of execution. These are hard to remember, and they are a frequent source of subtle programming errors.
APL has lots and lots of useful primitive functions - so many that any precedence rules would be very hard to remember. So APL has no special precedence. You can read the expression above as double the sum of x times w, and that’s exactly what APL does.
User-defined functions
You’ve now seen how to calculate the output of our hypothetical neuron, but it would be impractical to type in that code every time you wanted to know the output of a particular neuron.
Instead, you can define an APL function which will take the inputs and weights as arguments and calculate the result.
Enter the definition of our example neuron calculator like this:
eg ← {2×+/⍺×⍵}
This creates a function called eg which takes two arguments ⍺ and ⍵. It multiplies them together, sums the product and multiplies it by two. Here’s how to test it:
3.5 2.0 0.7 1.2 eg 0.5 0.3 0.1 0.2
If you want to add two numbers, you put the plus sign between them (using so-called infix notation). If you define your own APL function like eg which takes two arguments, you use the same syntax - hence the code above.
That’s probably as much as you can take in for now, and it’s certainly as much as I can write :)
In the next post you’ll take a look at the code used for several common types of neurons, and you’ll also see how to calculate the output of several neurons at once.
Comments and Questions welcome!
Have fun. Please leave a comment to let me know how you get on with these examples, and please ask if anything is unclear.


Comments
Post a Comment