Posts

Showing posts from April, 2010

Why are CAD tools so hard to use?

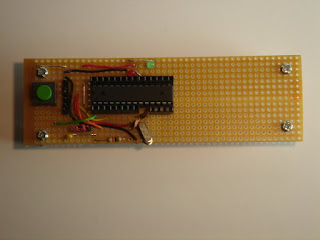
Years ago, when IBM was introducing thousands of its employees to the brave new world of object-oriented software, I found myself co-teaching an OO Analysis and Design course to a group of IBMers . My co-instructor and I were both independent contractors, but we were supported by an old friend who worked for IBM. After a particularly frustrating practical one of the students asked "Why are we using Rational Rose to draw our designs? It sucks." The IBMer replied: "All modelling tools suck. It's just that Rose sucks less." I've just had a similar experience trying to get started with Schematic Editors. I wanted to draw a schematic for the Veroduino - the low-cost, compact Arduino clone that I built a few days ago. I'd read that TinyCAD was very intuitive. I got going fairly quickly, but could not find a library with all the parts that I wanted. I tried to add a new library of my own; that process turned out to be so intuitive (not) that it crashed

Arduino on a budget - part 5

Image
Introducing the Veroduino The Veroduino is inspired by the Paperduino , Adafruit's Boarduino and Oomlout's Breadboard Arduino Compatible Kit . I built it on a length of Vero's 01-0171 stripboard . It's a narrow board with a central gap in the conductive strips. It's perfect for DIL components. I used Oomlout's Arduino Compatible Component Bundle and a set of stackable headers . The Veroduino Mk 1 has room for a 5v regulated power supply but for now I am using the FTDI USB TTL serial cable from Oomlout to program the board and to provide power. Veroduino Mk 1 almost fits on the stripboard but the Crystal overhangs the edge by about a millimeter. Mk2 will use a ceramic resonator and should be both cheaper and smaller. The cost of the Veroduino is under £15 inc VAT. You will also need a serial cable (£15.50 inc VAT). Oneof these can be used to program as many Veroduino boards as you want. You can develop and download software to the Veroduino using the Arduino d

Back in business

It took a couple of days to sort out the hardware problems that hit me last week. It seems that the CPU in my workstation has fried itself. I think I know why, and I'm hoping that a new CPU will fix the problem. At one point it looked as if two servers had also failed, but it turned out to be a problem with my aged UPS. I had to do a bit of re-cabling but both servers are ok. I removed the hard drive from the workstation and mounted it in one of the servers. All the data was there, which was a relief. The drive was reasonably well backed up but I would have lost a day's work - annoying rather than catastrophic. As it is I've lost nothing. I am using my Toshiba laptop as a temporary replacement. Its major disadvantages are that it's a Windows 7 machine and has no parallel port. I got back to Arduino development on Thursday; on Friday the USB to TTL cable arrived from Oomlout, and I now have my Veroduino working. I'll write about that soon. Meanwhile, I'd like to

Arduino on a budget - part 4

Normal service will be resumed as soon as possible! Yesterday my worksation died, and one of my servers failed. I'm currently a bit preoccupied, trying to find the root causes of the failures and restoring data busily. I hope to be able to get back to some Arduino work later today.

Arduino on a budget - part 3

Image
The best-made plans... I'd hoped to build version two of Veroduino (my Arduino clone on a strip-board), using a narrower piece of strip-board than my first attempt. Alas, the new version was too narrow; if you use a crystal for the controller's oscillator you need to connect it to a couple of capacitors, and I couldn't find a workable layout in the limited space available. I decided to use a SimmStick . SimmSticks have fallen out of fashion as the USB has taken over, but they still work well and I had a suitable board from Dontronics . The SimmStick can take a 28 or 40-pin Atmel AVR micro-controller; it took an hour or so to polulate the board and check it out. I already had a motherboard which provides power and RS232 comms if required. I modified the motherboard by adding a 30-pin PCB header. That gave me access to all the lines of the SimmBus; these include the SDA and SCL signals needed for I2C, as well as Ground and the 5v supply needed by my I2C boards. I now have a

Arduino on a budget - part 2

Image
I've made good progress with Veroduino - the Arduino clone I'm building on Veroboard™*. I like to build up complex circuits from pluggable components. They are easier to test, easier to replace, and can often be used in more than one project. I started by building a pluggable power supply on a small piece of strip-board; it contains a 5v regulator, and includes a bridge rectifier to provide polarity protection. Next I started on the board that carries the micro-controller. I abandoned my first prototype; the strip-board turned out to be too wide, covering the breadboard pads that connect to the pins of the micro-controller. I didn't feel too bad about that; the reason that I prototype is to discover design flaws early. I also verified that my mechanical design plugged into the board correctly. It's tempting to use PCB header pins, but they don't play well with this design. They work really well with a two-sided PCB, because the header can be soldered from the top.

Arduino on a budget - part 1

Image
Readers will know that I'm a fan of the Arduino, as is my daughter Alex . We currently share an Arduino board. I'm in the middle of a lengthy project, and I don't want to delay her access to the board. The obvious solution is to get a second Arduino. An Arduino Duemilanove board costs about £25 in the UK , and I'd prefer not to spend that much. Luckily the Arduino is open source, so lots of companies have developed their own versions. One popular alternative is the Boarduino from Adafruit , shown above. It's an Arduino clone with a much smaller footprint. You can't use standard Arduino Shields, but you can plug it into a breadboard - hence the name. If you're based in the UK .:Oomlout:. currently offer the Boarduino for £13.50 . I'd willingly spend that much, but a quick web search turned up two even cheaper possibilities; the Paperduino and the Stripboard Arduino . The Paperduino is a cool idea, but I'm looking for something a bit more robust, a

Introduction to Electronics for Hobbyists

Image
I just came across an excellent intro to Electronics. It's a great starting point for beginners in Electronics and a useful reference for veterans. The sections give a good overview of commonly used components. The page on resistors includes a very nice guide to colour codes. There are several pages on construction , including a soldering guide . It's generally good, though the reference to lead-based solder is a little outdated. The kits are commercially available from RSH Electronics . If the kits are as good as the website, they are worth a look! (Image from Wikimedia creative commons)

Basics of I2C™

Image
The I2C bus allows you to connect several peripherals to one or more master controllers. In this diagram the controller is an Arduino; it is connected to a port extender and an LCD display. One commonly used port extender can drive up to 8 i/o lines; you might use four lines to control LEDs, and four lines to read push-buttons. It's a simple IC chip which costs about £1. All you do is connect it to ground, to a 5 volt power source and to the two data lines that form the I2C bus. The Arduino has a Wire library which allows you to turn the output lines on or off, and to read the state of the input lines. A commercial I2C LCD display is a bit more expensive (about £30). I built my own using a cheap serial LCD module (about £7) wired up to a port extender. I drive it using a modified Arduino library which someone else wrote for a slightly different port extender chip. The Arduino supports the original version of the I2C protocol which allows me to connect up to 127 different devices t

Arduino rocks!

Image
I've fallen in love with the Arduino . This amazing piece of hardware brings micro controllers to the masses. It was designed for non-geeks who want to do physical computing, but it's turned out to be just as popular with geeks. The Arduino provides a fun, inexpensive, easy-to-use platform for electonics and robotics. Best of all, it's open source - part of a radical extension of the open-source concept from the software world to the world of hardware. I'm currently working on a family of low-cost electronic test equipment, driven by an arduino and connected by an I2C™ bus. I'll be using an attached PC for graphical display. I'll blog about progress here. I will open-source and publish the hardware and software designs, and may even offer parts kits if there's enough interest. (Image from Wikipedia - placed in the public domain by its author).