Posts

More fun with Spiking Neural Networks and JAX
Image
I'm currently exploring Spiking Neural Networks. SNNs (Spiking Neural Networks) try to model the brain more accurately than most of the Artificial Neural Networks used in Deep Learning. There are some SNN implementations available in TensorFlow and PyTorch but I'm keen to explore them using pure Python. I find that Python code gives me confidence in my understanding. But there's a problem. SNNs need a lot of computing power. Even if I use numpy, large-scale simulations can run slowly. Spike generation - code below So I'm using JAX. JAX code runs in a traditional Python environment. JAX has array processing modules that are closely based on numpy's syntax. It also has a JIT (Just-in-time) compiler that lets you transparently deploy your code to GPUs. Jitting imposes some minor restrictions on your code but it leads to dramatic speed-ups. JAX and robotics As I mentioned in an earlier post, you can run JAX on NVIDIA's Jetson family. You get excellent performance on...

Installing Jax on the Jetson Nano

Image
Yesterday I got Jax running on a Jetson Nano. There's been some online interest and I promised to describe the installation. I'll cover the process below but first I'll briefly explain What's Jax, and why do I want it? tldr: The cool kids have moved from Tensorflow to Jax.   If you're interested in AI and Artificial Neural Networks (ANNs) you'll have heard of Google's TensorFlow. Tensorflow with Keras makes it easy to build an ANNs from standard software components train the network test it and deploy it into production Even better: TensorFlow can take advantage of a GPU or TPU if they are available, which allows a dramatic speedup of the training process. That's a big deal because training a complex network from scratch might take weeks of computer time. However , I find it hard to get TensorFlow and its competitors to use novel network architectures.  I am currently exploring types of  network that I can't implement easily in TensorFlow. I could c...

MicroPlot on the PyPortal - progress and frustration

Image
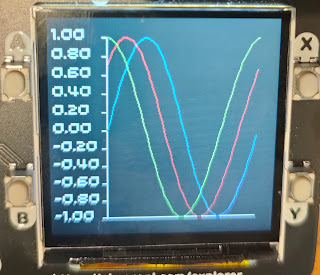
Update: I got a fix within minutes of posing the problem on the Adafruit discord channel! Here's the correct bitmap: The problem is now solved, MicroPlot now runs well on the Adafruit PyPortal and  Clue as well as the Pimoroni Pico Explorer base, but I've been tearing my hair out trying to solve a problem saving bitmaps. The bitmap problem Here's a screenshot of a display on the PyPortal together with the bitmap file which should show what's on the screen. I could not work out what's going wrong. The code creates the plot and then uses the screenshot code that Adafruit provides. import math from plotter import Plotter from plots import LinePlot import board import digitalio import busio import adafruit_sdcard import storage from adafruit_bitmapsaver import save_pixels def plot(): sines = list(math.sin(math.radians(x)) for x in range(0, 361, 4)) lineplot = LinePlot([sines],'MicroPlot line') plotter = Plotter() lineplot.p...

More Raspberry Pi Pico experiments

Image
If you're exploring the Raspberry Pi pico, here are some more resources MicroPlot I've started a new project called MicroPlot. It's been developed on the Pico though it will eventually work on other  micro-controllers and computers. It's a minimal plotting package and it already has enough functionality to be useful. It will plot simple line plots; the first example below is a series if sine waves and the second shows the voltage across a capacitor as it charges and discharges. Plotting Sine waves Capacitor charging and discharging MicroPlot has its own project on GitHub. You can read about it and download the code at https://github.com/romilly/microplot and I will be soon be using it for some more electronics experiments. Using the UART The current MicroPython documenation for the Raspberry Pi Pico is a bit thin on detail about using the UART. I've added a short example in my pico-code project on GitHub. The Tiny2040 is available from Pimoroni! Pimoroni Tiny2040 I...

MicroPython development on the Raspberry Pi Pico

Get Started with MicroPython on Raspberry Pi Pico  suggests that you use the Thonny editor for development. Thonny will get you off to a quick start, but you may have an alternative editor you'd prefer to use. Lots of my friends now use VS Code; some are vim or emacs experts; many, like me, use PyCharm as their normal Python development environment. I find it more comfortable to use my normal editor for MicroPython development, but I have more compelling reasons. The first is refactoring support. I'm learning as I go, and I often want to improve the design of my code libraries as I come to understand things better. PyCharm does a very good job of refactoring Python code. There's another issue to do with version control. I'm currently sharing my Pico code on GitHub. That means I need to keep code on the Pico in sync with the code on my workstation. I haven't found an easy way to do that with Thonny, so I am using another tool to move and test code. rshell was my fi...

Raspberry Pi Pico project 2 - MCP3008

Image
This post show you how to drive the MCP3008 8-channel ADC using a Raspberry Pi Pico. I'll start with a personally embarrassing and annoyingly relevant story. I'll also tell you about a minor 'gotcha' when using SPI on the Pico, and how you can avoid it. Finally, I've include the code and fritzing diagram I used to test the interface. First, the story. Back in 2012, when the Raspberry Pi was fresh and new, I was running a startup called Quick2Wire.  We made add-on boards for the Pi. Just before Christmas we sent out our first batch of boards to a small army of beta-testers. The beta boards didn't work. Somehow a single trace on the pcb had got deleted and one of the GPIO pins was isolated. The boards were still usable and it wasn't too hard to solder in a jumper wire to replace the missing trace, but it was very embarrassing. It wasn't just that we'd shipped boards with a defect. The really annoying thing was that I'd set up an  automated loop-bac...

Raspberry Pi Pico - simple projects

Image
Introducing fungen - an AF function generator. Lots of pioneers are now creating tutorials and sample projects for the Raspberry Pi Pico and the Pimoroni Tiny2040. One of my first mini-projects is fungen - a Pico-based AF (audio frequency) function generator that uses the Pico's PIO (programmable I/O) to generate a waveform. The Pico's head start The Pico was announced just a few days ago. It arrived out of the blue complete with lots of interesting add-ons available, and with excellent documentation. The reference documentation is full of useful examples, including several that take advantage of the Pico's powerful PIO. PIO allows users to set up custom input-output capability, and one of the examples shows how to use PIO to implement PWM (Pulse width modulation). The Pico already has plenty of PWM-capable pins, but I wondered if I could hack the PWM code to turn the Pico into a simple signal generator. Indeed you can, and that's how fungen works. I made a couple of mi...