Posts

Showing posts from May, 2019

apl-reggie: Regular Expressions made easier in APL

What's APL? Like GNU, APL is a recursive acronym; it's A Programming Language. I first met APL at the IBM education centre in Sudbury Towers in London. I was a student reading Maths at Cambridge University, and IBM asked me to do a summer research project into a new technology called Computer Assisted Instruction. (I wonder what happened to that crazy idea?) APL was one of the first languages to offer a REPL (Read Evaluate Print Loop), so it looked like good technology for exploratory programming. APL was created by a mathematician. Its notation and syntax rationalise mathematical notation, and it was designed to describe array (tensor) operations naturally and consistently. For a while in the '70s and '80s APL ruled the corporate IT world. These days it's used to solve problems that involve complex calculations on large arrays. It's not yet used as widely as it should be by AI researchers or Data Scientists, but I think it will be, for reasons that

Another free tool for Jetson Nano users

Image
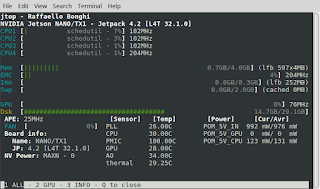
jtop outout Raffaello Bonghi, one of the members of the unofficial Jetson Nano group on FaceBook has published jetson-stats , a toolkit for Jetson users. jetson-stats works on all the members of the Jetson family. My favourite program in jetson-stats is jtop. It's a greatly enhanced version of the linux top command. jtop shows a very useful real-time view of CPU and GPU load, memory use and chip temperature. Find jetson-stats on GitHub , or install it via pip/pip3.

AL/DL explorers - two great, free resources for you

Image
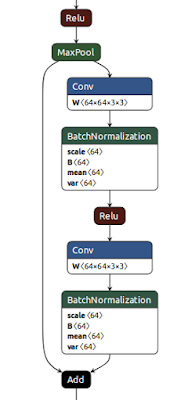
I'd like to share two really useful free resources for anyone exploring Artificial Intelligence and Deep Learning. Netron The first is netron - an Open Source tool for displaying Deep Learning models. The image on the right is a small part of netron's display of  resnet-18. Netron covers a wide range of saved model formats is really easy to install is MIT licensed  is implemented in JavaScript and  can be installed and invoked from Python. Computer Vision Resources The second find is Joshua Li's 'Jumble of Computer Vision' - a curated list of papers and blog posts about Computer Vision topics. It's going to keep me reading for weeks to come :) Many thanks to Joshua for making this available.

Five steps to connect Jetson Nano and Arduino

Image
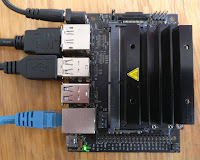
Yesterday's post showed how to link a micro:bit to the Jetson Nano. One of the members of the (unofficial) NVIDIA Jetson Nano group on Facebook asked about connecting an Arduino to the Jetson. Here's a simple recipe for getting data from the Arduino to the Jetson Nano. It should work on all the Jetson models, not just the Nano, but I only have Nanos to hand. On request, I've added a recipe at the end of this post which sends data from the Jetson Nano to the Arduino; it turns the default LED on the Arduino on or off. The recipe for sending data from the Arduino to the Jetson has just 5 stages: Program the Arduino. (I used the ASCIITable example). Connect the Arduino to the Jetson using a USB connector Install pyserial on the Jetson Download a three-line Python script Run the script.   Programming the Arduino I used an Arduino Uno, and checked it on a verteran Duemilanove (above), but any Arduino should work. You'll need to do this step usi

Connect the Jetson Nano to the BBC micro:bit in 5 minutes or less

Image
There's huge interest in using the Jetson Nano for Edge AI - the place where Physical Computing meets Artificial Intelligence. As the last few posts have shown , you can easily train and run Deep Learning models on the Nano. You'll see today that it's just as easy to connect the Nano to the outside world. In this simple proof-of-concept you'll see how to connect the Nano to a BBC micro:bit and have the Nano respond to an external signal (a press on the micro:bit's button A). You'll need a Jetson Nano a computer with the Mu editor installed a BBC micro:bit a USB lead to connect the Jetson to the micro:bit Here's a video that takes you through the whole process in less than 5 minutes. I'll be posting more complex examples over the next few days. To make sure you don't miss them, follow @rareblog on twitter.

Getting Started with the Jetson Nano - part 4

Image
I'm amazed at how much the Nano can do on its own, but there are times when it needs some help. A frustrating problem... Some deep learning models are too large to train on the Nano. Others need so much data that training times on the Nano would be prohibitive. Today's post shows you one simple solution. ... and a simple solution In the previous tutorial , you went through five main steps to deploy the TensorFlow model: Get training data Define the model Train the model Test the model Use the model to classify unseen data Here's the key idea: you don't have to do all those steps on the same computer . Saving and Loading Keras Models   The Keras interface to TensorFlow makes it very easy to export a trained model to a file . That file contains information about the way the model is structured, and it also contains the weights which were set as the model learned from the training data. That's all you need to recreate a usable copy of th

Getting started with the Jetson Nano - part 3

Image
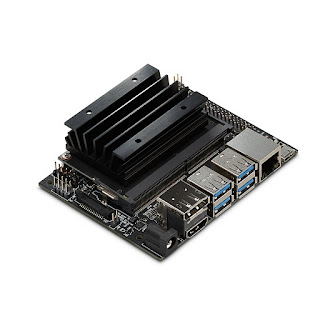
Jetson Nano image courtesy of NVIDIA/Pimoroni In part 2 of this series you prepared your Jetson Nano for software installation. In this part you'll install Jupyter Notebook, Jupyter lab, TensorFlow and some other software that is needed to run the first TensorFlow notebook. Once started, you can leave the software installation to run; it takes about an hour on a Nano in 10W power mode. It probably takes a little longer if you're using a 2.5A supply. There's a final manual stage which takes a couple of minutes. When that's complete you'll be able to work through the TensorFlow example, training a Neural Net to recognise item images from a Fashion database and then testing it in previously unseen images. Here's what you'll do, in a little more detail. Installing the software Open a terminal window on the Nano  (A short-cut,  crl-alt-T should do it). You'll be in your home directory; type git clone https://github.com/romilly/nano.g

Getting Started with the Jetson Nano - Part 2

Image
Learning with the Nano This is the second in a series about getting started with the Jetson Nano. Part 1 is here . It's taken a while, but I now have a simple, repeatable set-up process for installing and running TensorFlow on the Jetson Nano using Jupyter Notebooks. It's simple and repeatable but slow . Jupyter Notebook saves a lot of time and angst once it's available but it takes a while to install. Fortunately I now have a script that automates the installation so you can go away and drink a coffee while the installation runs. Before you can install the software, though, you need to complete the installation of Ubuntu. That's what this post covers. My first post about the Nano described the hardware you need and pointed you to instructions that explain how to prepare your SD card. Once you've got your hardware and have prepared the SD card, it's time to fire up the Nano. Getting ready Plug in the HDMI cable, the Ethernet cable, the keyboa

Getting Started with the Jetson Nano

Image
Note: The approach outlined in this series will still work, but there is an interesting official alternative. The Jetson team at NVIDIA have created an excellent self-study course , supported by a downloadable image which is similar to the one used in these articles. To use the NVIDIA image, you'll need: Jetson Nano Developer Kit Computer with Internet Access and SD card port microSD Memory Card (32GB UHS-I minimum) USB cable (Micro-B to Type-A) If you just want to use the course image, you can get by with those items and a 5V 2.5A power supply but to take the course you will need compatible 5V 4A Power Supply with 2.1mm DC barrel connector 2-pin jumper compatible camera such as Logitech C270 Webcam or Raspberry Pi Camera Module v2 You will not need a monitor, mouse or keyboard . To learn where to find the DLI course image, and how to get started with it, you should enroll on the course . It's free, takes about 8 hours, and will give you an excellent